
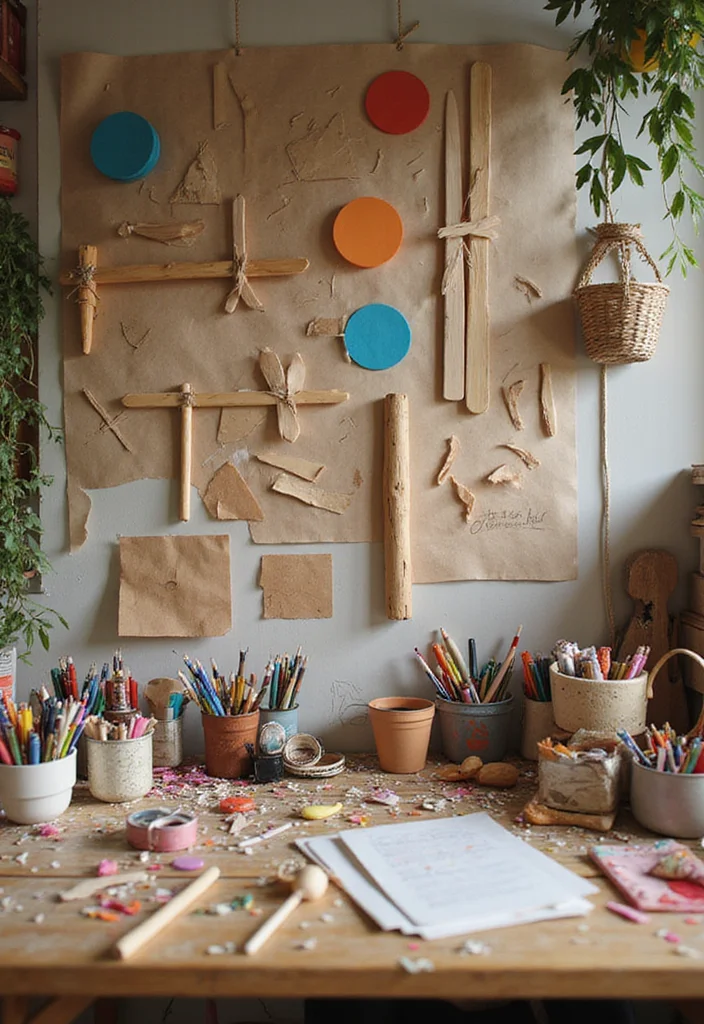
Are you looking for a fun and budget-friendly way to spruce up your home decor? You’re not alone! With everyone spending more time at home, many of us are on the hunt for creative projects that add a personal touch to our spaces. That’s why I created this guide to DIY popsicle stick crafts.
If you love getting crafty or if you have kids who are itching to dive into some easy crafts, this post is for you. You might be surprised at how versatile popsicle sticks can be. They’re not just for summer treats anymore! From wall art to storage solutions, you’ll find plenty of projects that are simple enough for kids and satisfying enough for adults.
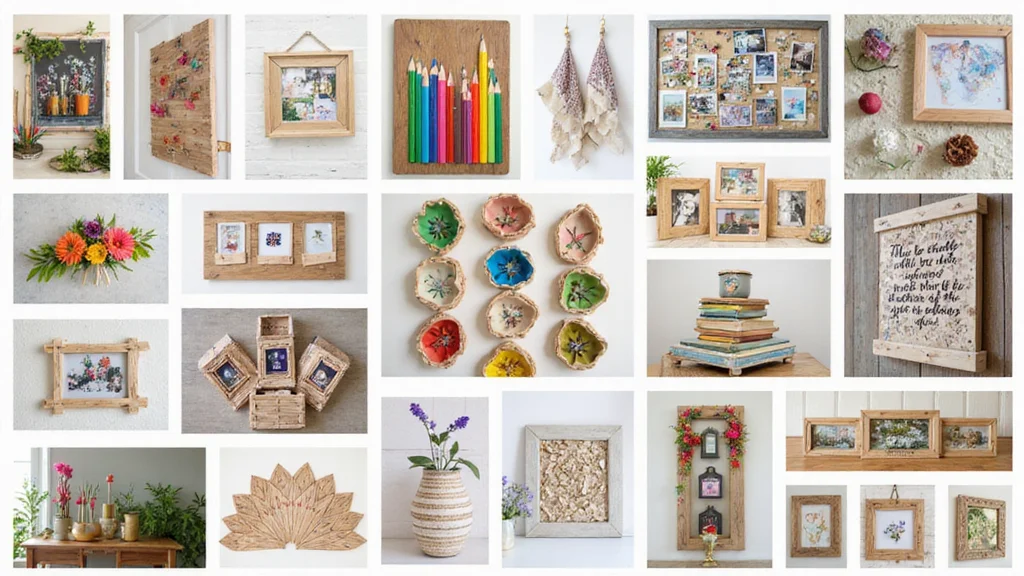
In this guide, you’ll discover 19 easy project ideas that will help you transform ordinary popsicle sticks into extraordinary home decor. Each project offers step-by-step instructions, so you can turn that pile of sticks into beautiful pieces that showcase your creativity. Whether you’re after something decorative or functional, you’ll find ideas that fit any style and need. Get ready to grab your glue, because fun and creativity await!
Key Takeaways
– Explore 19 unique DIY popsicle stick projects ideal for home decor, including wall art and photo frames.
– These crafts are budget-friendly, making them perfect for those looking to beautify their space without breaking the bank.
– Each project comes with clear, step-by-step instructions, so you can easily follow along and create your own masterpieces.
– Many projects are suitable for children, offering a great opportunity for family bonding while crafting together.
– You’ll gain inspiration to personalize your home with creative and fun decor that reflects your style and personality.
1. Popsicle Stick Wall Art
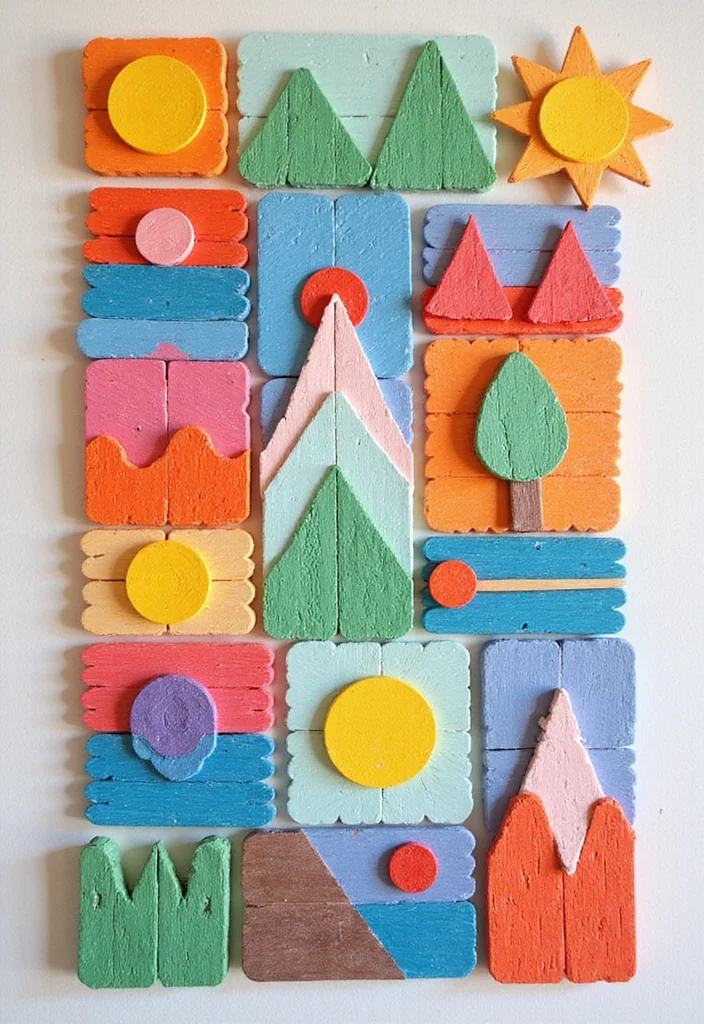
This element adds playful energy and a handmade vibe to your space. Create a wall piece from sticks that you can color in bright shades or leave natural for a warm, earthy touch. Try simple geometric shapes or a soft landscape to guide the eye. Pinterest loves these easy DIYs for cozy, contemporary rooms.
To make it work, lay out designs on a flat surface before sticking them to the wall. Keep costs down by using leftover paint and basic glue. A rearrangeable layout makes it easy to find the best composition. This craft brings personality and warmth to any room.
• Use cohesive color palette to guide layout
• Choose gallery-worthy grid for balance
• Pick rearrangeable sticks for customization
• Add photos or mirrors for personalization
This playful project brings personality and warmth to any room.
2. Photo Frames
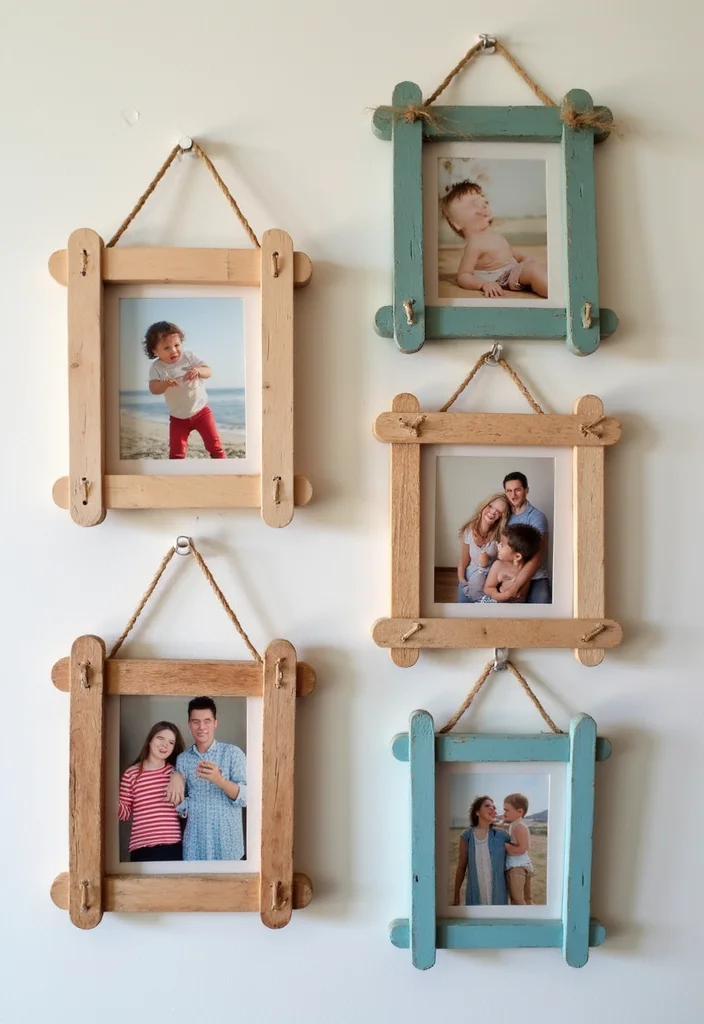
Custom popsicle stick photo frames bring a warm, crafty vibe to your spaces. Start with a simple square frame, then lay sticks around the edges and glue at the corners for a tight border. Paint in soft pastels or a rich stain to suit your room. This project shows your photos in a unique, tactile way.
To implement, cut and arrange sticks around the base frame, letting overlaps add texture. Opt for budget-friendly sticks or offcuts to keep costs low. Finish with beads, twine, or buttons to match your decor. It makes a small statement that is easy on the wallet.
• Use square or rectangular shapes for clean lines
• Choose beads or twine for texture and charm
• Pick paint in soft tones to match decor
• Add varied frame sizes for gallery wall display
These frames turn simple photos into a curated memory corner.
3. Storage Caddies
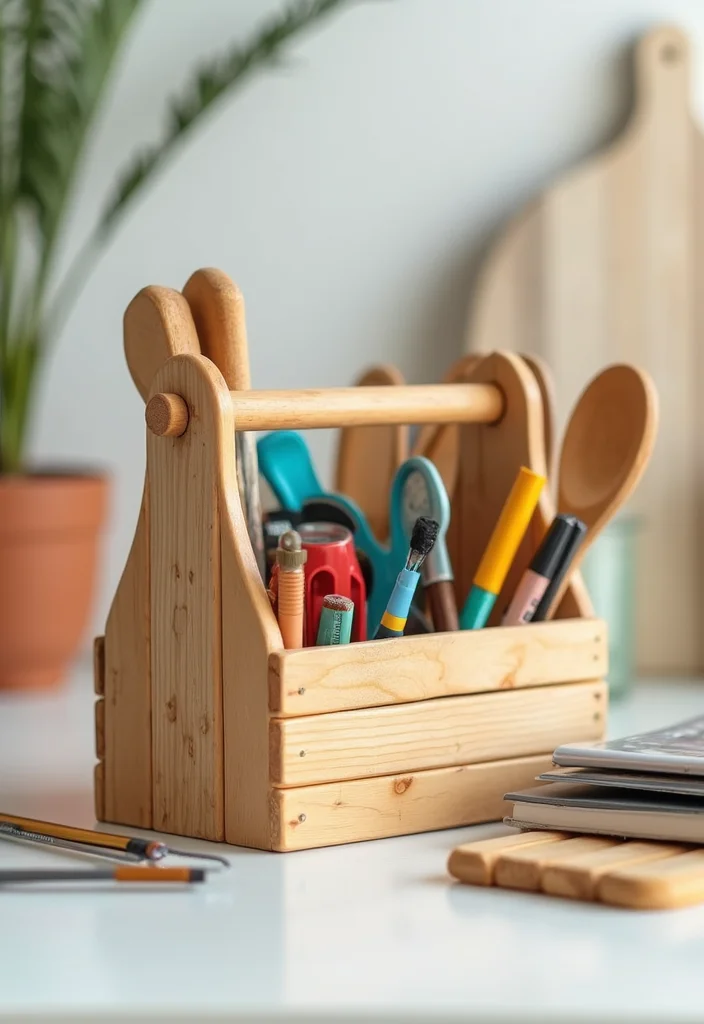
These storage caddies blend function with charm. Build a simple tray by gluing sticks side by side to form a box, then add dividers with extra sticks. Leave natural for a wood look, or paint in bold colors to match your space. They turn clutter into art while staying practical.
To implement, plan the size, use offcuts, seal with varnish. Measure what you will hold and tailor the size. Use offcuts to keep costs low and avoid waste. Finish with a clear coat to resist moisture. This project blends craft fun with tidy organizing, making life calmer.
• Use dividers within the caddy for neat sections
• Choose vibrant paints to brighten shelves and add personality
• Pick budget-friendly sticks for low cost construction
• Add felt pads to protect surfaces and reduce slips
This keeps spaces tidy while adding a splash of craft color.
4. Miniature Furniture
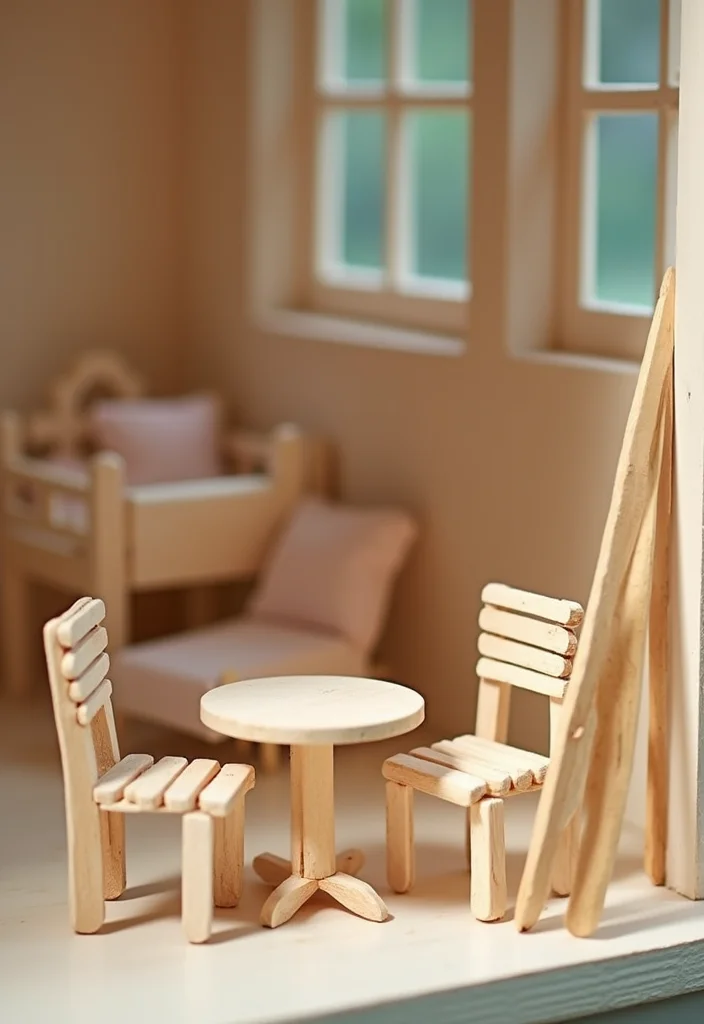
Tiny furniture opens a world of playful design. Sketch rough plans, then stack sticks for legs and broad pieces for tabletops. A quick coat of paint makes them look real, from modern stools to rustic benches. This project invites kids to imagine and you to craft.
Start with simple dimensions and grow your set as you go. Use strong glue and clamps when needed. Pick durable finishes that dry clear. It becomes a fun, educational activity that sparks pretend play.
• Use scale drawings to plan lengths well
• Choose durable glue for solid joints
• Pick bright colors for lively looks
• Add kid-friendly shapes to boost creativity
These mini pieces spark creativity and offer tiny spaces with big smiles.
5. Garden Markers
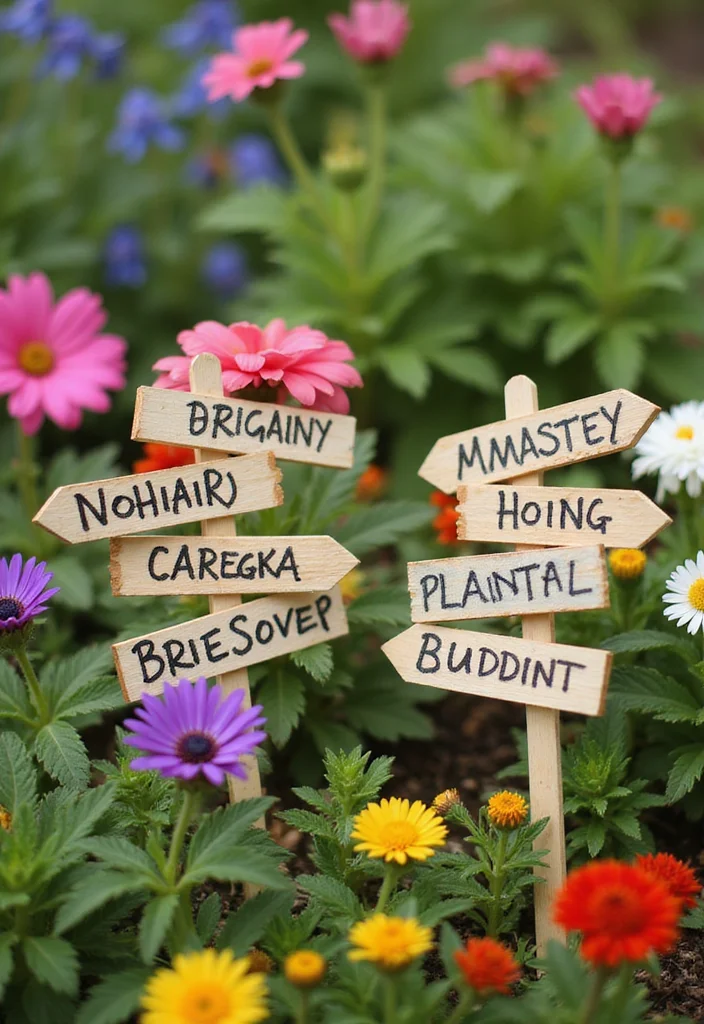
Garden markers bring color and order to your beds. Feed your plants’ names on the sticks with a sharp marker, then seal with a clear finish. Use bright colors or forest tones to suit your garden mood. They turn a simple tool into a charming feature.
Label clearly and keep labels readable for seasons. Choose inexpensive paints to keep costs low. Group markers by herb, veg, and flower for quick reference. It makes gardening feel joyful and organized.
• Use waterproof markers for lasting labels
• Choose color-coded categories for easy scanning
• Pick varied marker styles to add charm
• Add kids participation to teach gardening
Your garden looks lively and easier to manage.
6. Wall Hooks
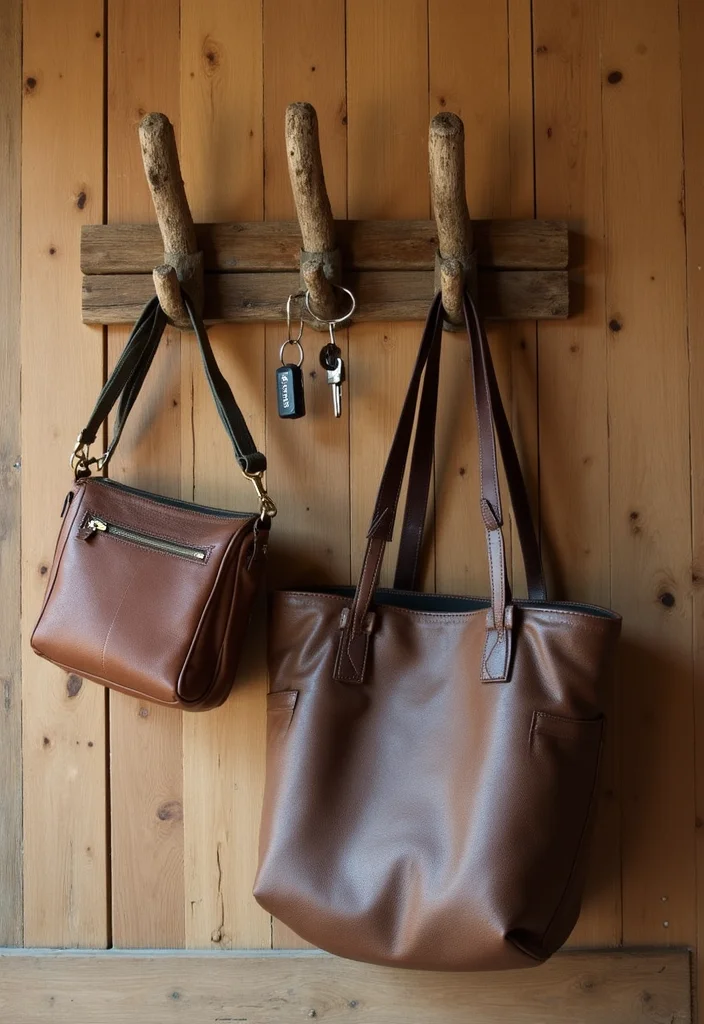
Hooks built from sticks turn a plain wall into a friendly storage spot. Glue sticks into a solid base, then insert hooks at even intervals. Paint for a bold punch or leave natural for a rustic vibe. Use sturdy anchors so it carries keys, bags, and hats.
Try shapes like a star or a wave to add motion. Match colors to your decor to keep harmony. Test weight limits before loading items. It adds style and order.
• Use angled glue layout for strength
• Choose colorful hooks to pop eyes
• Pick space-saving sizes for versatility
• Add hidden mounting for clean look
This simple upgrade makes every hallway feel welcoming.
7. Coasters
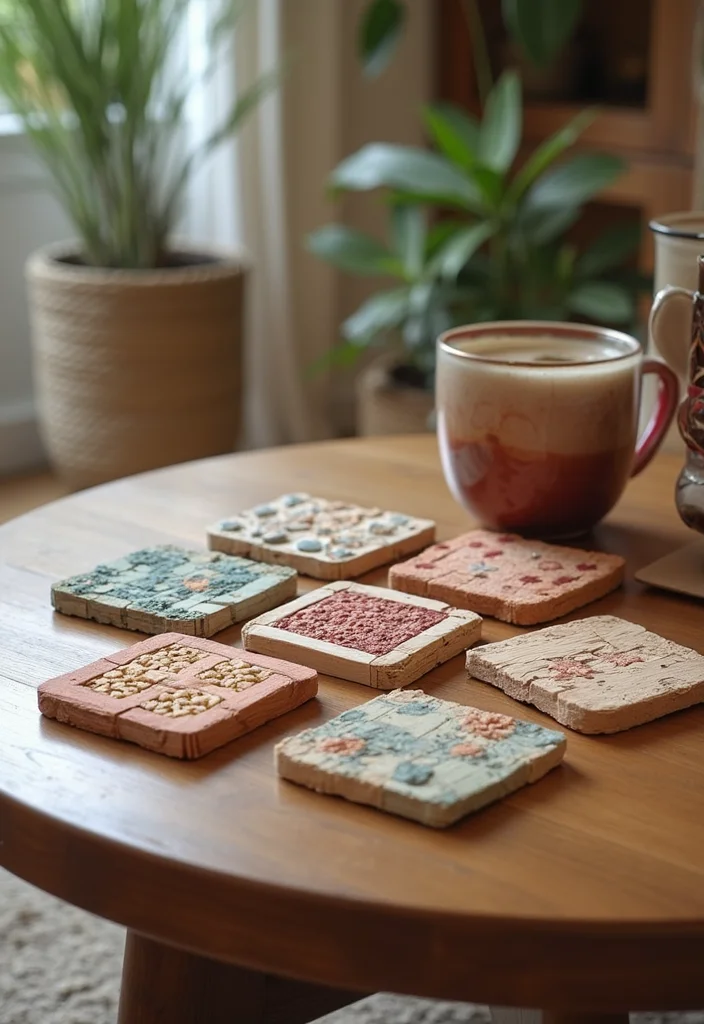
Protect your surfaces with custom popsicle stick coasters that are both functional and stylish. These coasters are simple to make and can be tailored to fit your decor. Start with a square or round design and glue sticks together in a tight pattern. Once dried, you can paint or stain them to match your dining room or patio setup. They make for wonderful gifts too!
Seal them with a clear varnish for added durability against spills. Create a set of coasters with different colors for a playful touch on your coffee table.
• Use tight glue pattern for solid boards
• Choose varied colors for a playful set
• Pick round or square shapes for versatility
• Add sealant finish for durability
These little mats brighten meals and protect surfaces.
8. Jewelry Holder
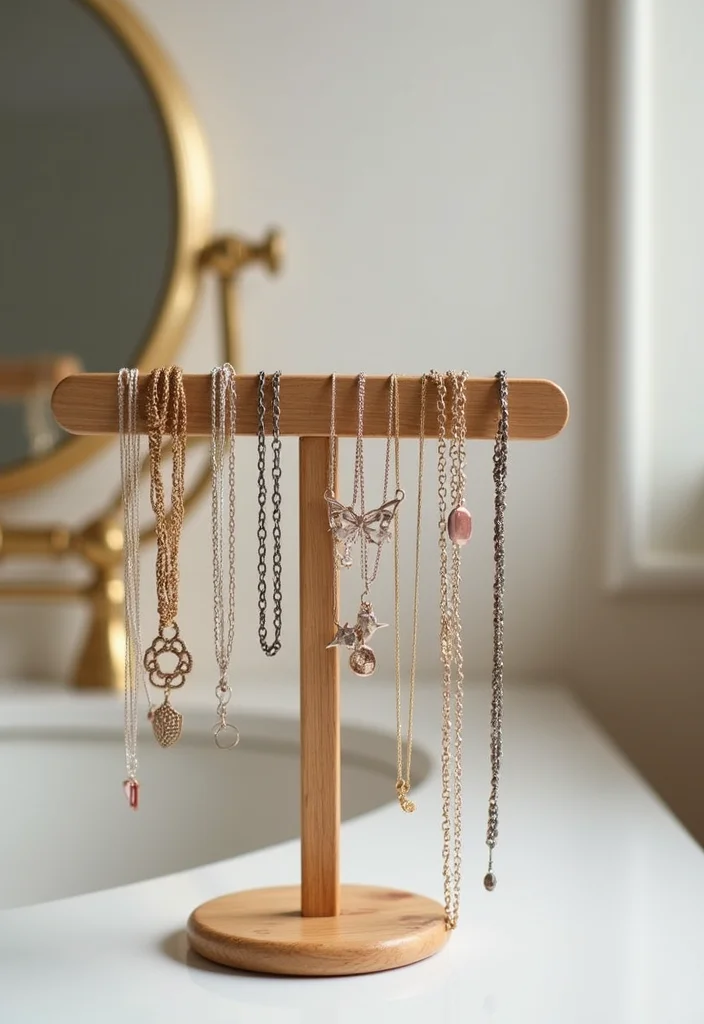
Keep your accessories organized and displayed beautifully with a popsicle stick jewelry holder. This project is not only practical but also adds a creative touch to your dressing area. To create one, glue sticks in the shape of a frame, and add vertical sticks for hanging necklaces or bracelets. Paint it in soft pastel colors or a bold hue that matches your style. You can personalize it with embellishments like beads or ribbons.
Make sure to secure the hooks well to handle the weight of your jewelry. Use a few different heights for variety. Personalize it with initials or colors to suit someone special. It makes a thoughtful gift.
• Use vertical pegs for hanging jewelry
• Choose soft pastel tones for calm vibes
• Pick embellishments to decorate
• Add weight-tested hooks for safety
This piece adds style and a kept-tidy vibe.
9. Napkin Holder
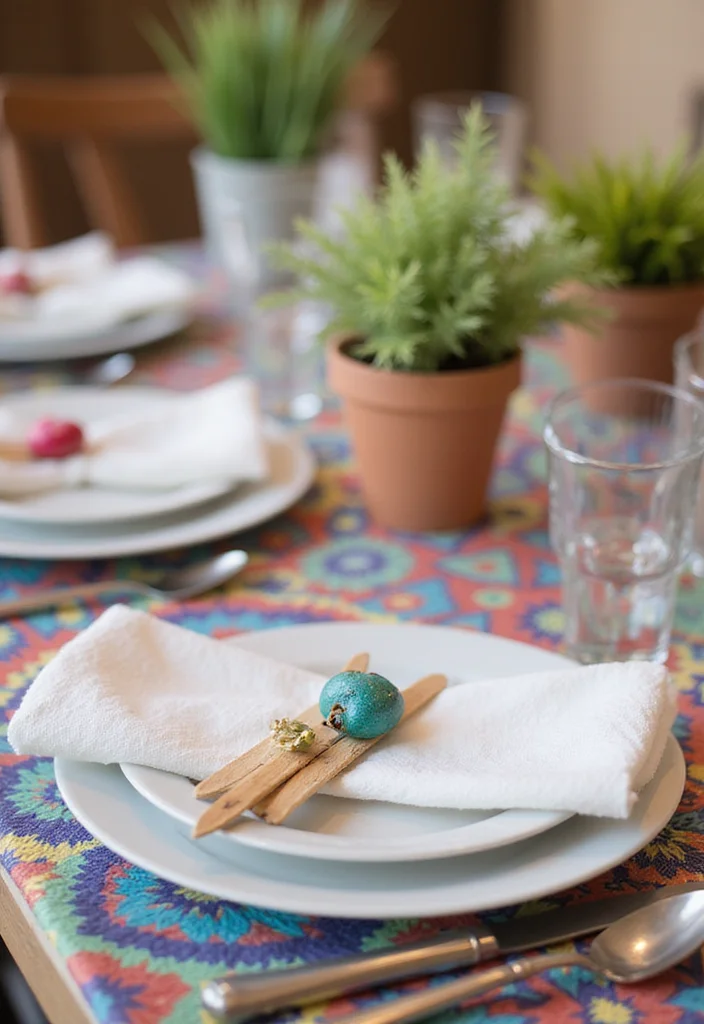
Napkin holders from sticks bring personality to the table. Build a rectangle using sticks and glue it firmly. Leave natural or paint in bright shades to match your table setting. A few flowers or twine finish the look.
Finish with a clear varnish to resist moisture. Make several in different colors for seasonal tables. Pair with matching coasters for a coordinated set. It adds warmth to everyday meals.
• Use rectangle frame base for stability
• Choose waterproof paint for longevity
• Pick seasonal colors to match moods
• Add decorative twine accents
Your table will feel inviting and organized.
10. Birdhouse
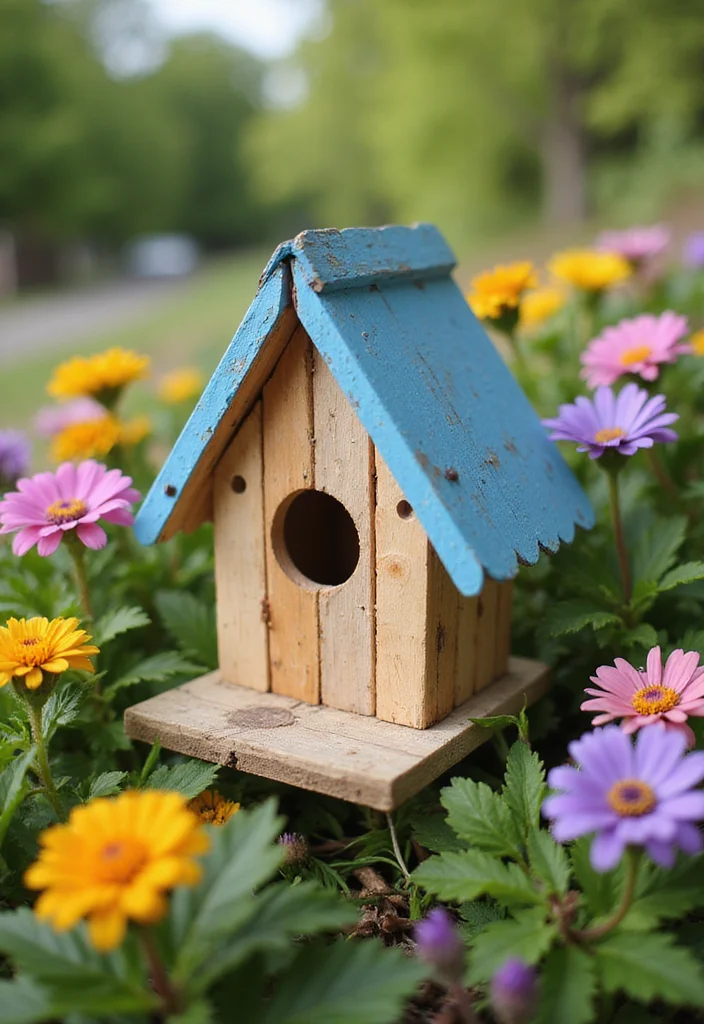
Birdhouses invite wildlife into your yard. Build a cheerful birdhouse that invites birds to rest. Shape a simple box from sticks and cap with a small slanted roof. Paint bright colors or patterns to catch the eye. Make the entrance hole just right for local birds.
Choose a sheltered spot to keep it safe. Use nails or screws for extra durability on roof joints. Coat with weatherproof paint to extend life. It can be a family project that teaches nature.
• Use simple box shapes for quick build
• Choose weatherproof paint for longevity
• Pick proper hole size for birds
• Add sheltered mounting for safety
It sparks curiosity while welcoming nature to your yard.
11. Pencil Holder
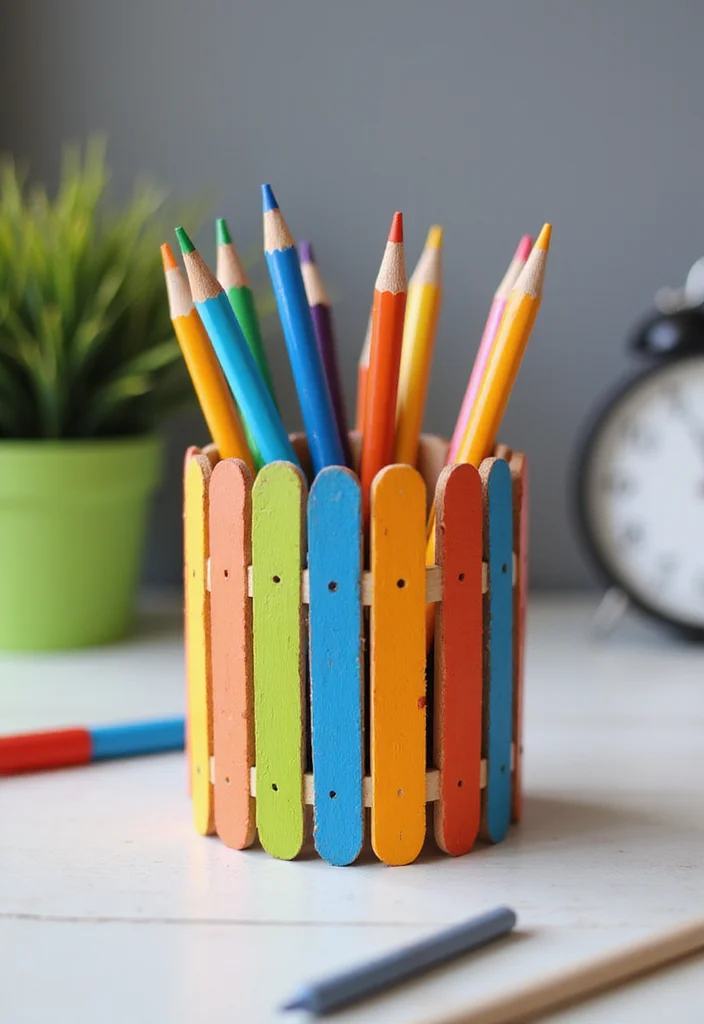
Stay organized and stylish with a popsicle stick pencil holder. This simple DIY project is a fun way to tidy up your workspace while adding a personal touch. Use a jar or base and glue sticks vertically around the jar or base for a rustic look. Paint it in fun colors to match your room decor. You can even add small embellishments for that extra creative flair!
Tip: Create multiple holders in different heights for a dynamic look on your desk.
• Use vertical slots for pencils
• Choose vibrant colors to brighten desks
• Pick multiple heights for layered display
• Add kid-safe paints for spaces
This organizer keeps homework time smooth and fun.
12. Decorative Baskets
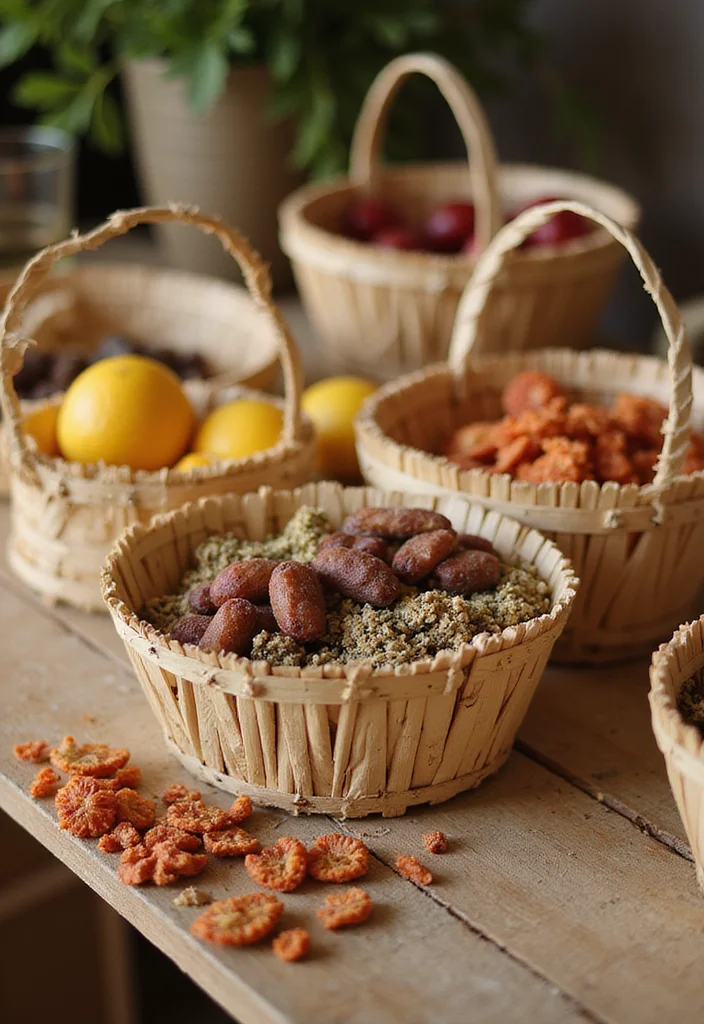
Create unique decorative baskets from popsicle sticks that can serve various purposes, from holding odds and ends to acting as rustic centerpieces. To start, glue sticks in a circular or square shape, adding height as desired. Paint them in colors that complement your home decor, or leave them natural for a rustic vibe. They are perfect for displaying fruits, potpourri, or even as gift baskets!
Make various sizes for different uses around your home. Pair these baskets with natural elements like jute or twine to enhance their rustic feel.
• Use round and square bases for variety
• Choose soft earth tones for cohesion
• Pick natural fibers to finish look
• Add varied heights for display depth
These baskets keep spaces neat and inviting.
13. Bookmarks
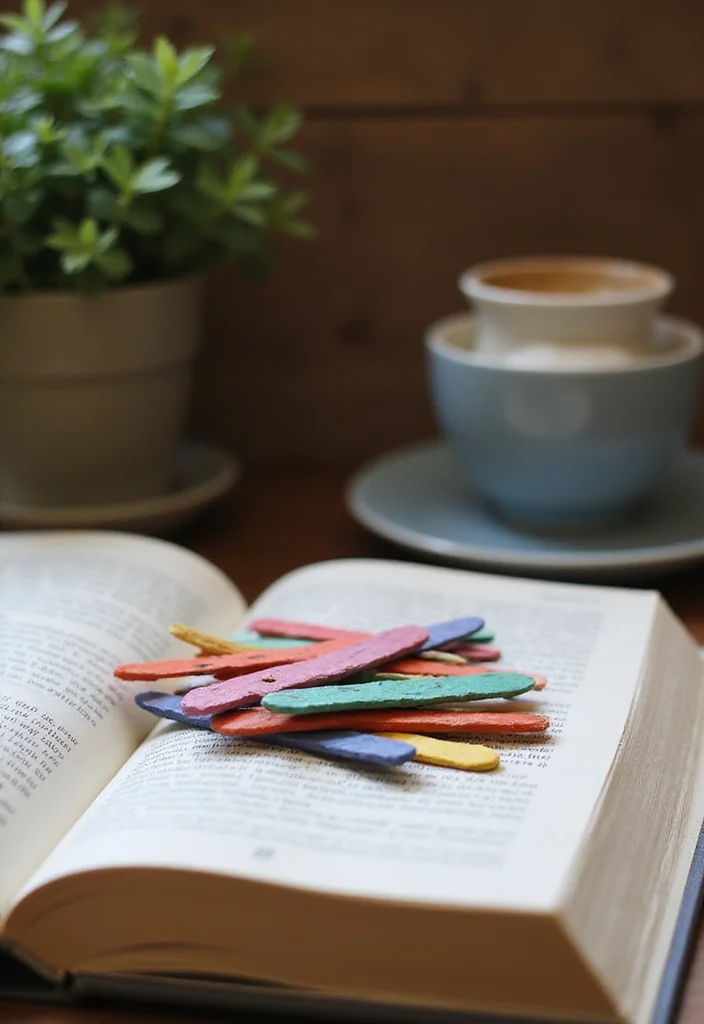
Never lose your page again with custom popsicle stick bookmarks. This fun and easy project is perfect for book lovers of all ages. Simply cut sticks to your desired length and paint them in your favorite colors or patterns. You can even add embellishments like felt, ribbons, or stickers for a personal touch. It’s a great way to express your individuality while keeping your books in order!
Try designs inspired by your favorite books or the seasons. Gift sets bring smiles and keep pages saved. Use sealant to avoid wear. They are easy to share.
• Use long slim sticks as page guides
• Choose themed patterns for fun
• Pick felt accents for texture
• Add gift-ready packaging for gifting
Friends will love these small, thoughtful keepsakes.
14. Holiday Ornaments
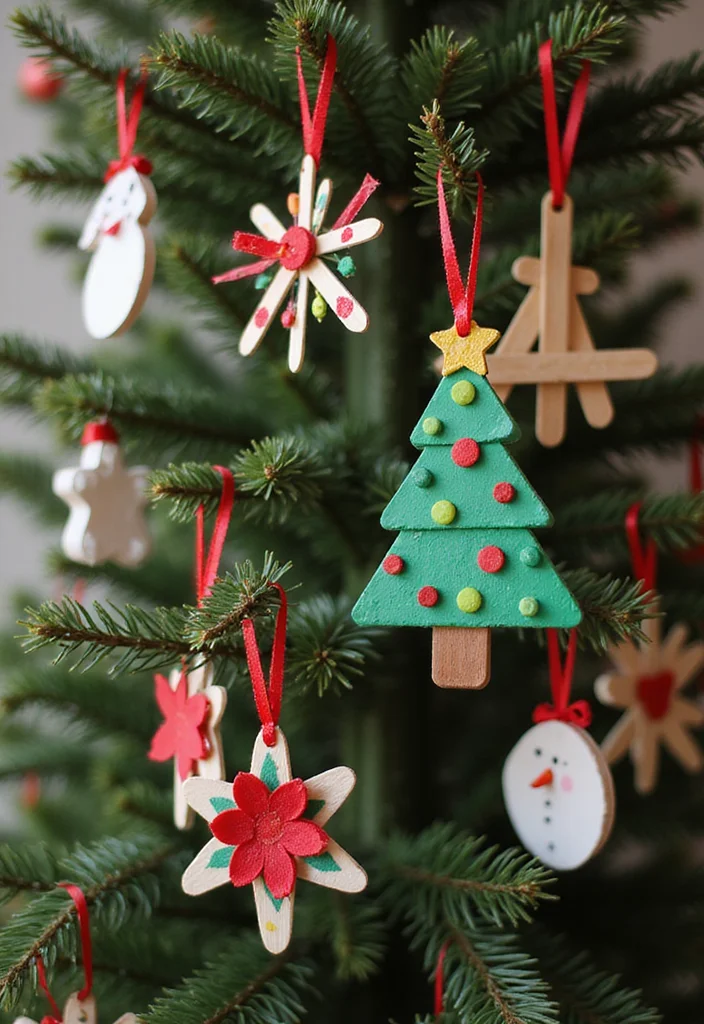
Seasonal popsicle stick ornaments brighten every holiday corner. Glue sticks into snowflake shapes for Christmas or tiny bunnies for Easter. Paint in festive colors and add a sprinkle of glitter for sparkle. Personal dates or wishes add sentiment.
Coat with a clear finish to last year after year. Make several at once to stock your decorations box. Involve family to share the joy.
• Use classic snowflake shapes for Christmas
• Choose bright festive colors to sparkle
• Pick glitter accents for shine
• Add personal dates for memory
These ornaments create memories you can reuse every year.
15. Wall Calendar

Keep track of your days with a DIY popsicle stick wall calendar. This is a fun project that can be tailored to fit your needs while adding character to your wall. Create a grid using sticks and label each square with the days of the month. Use small clips or magnets for attaching notes or reminders. You can paint the grid in bright colors or keep it natural. It’s functional and adds a decorative touch to any room!
Update it each month for a fresh look. Involve the family by letting each member design their own month’s section. Use bright colors for quick scanning. It blends utility with cozy style.
• Use grid layout for clear planning
• Choose color-coded days for quick read
• Pick magnet clips for notes
• Add monthly refreshes for variety
This calendar stays useful and decorative in every room.
16. Key Holder
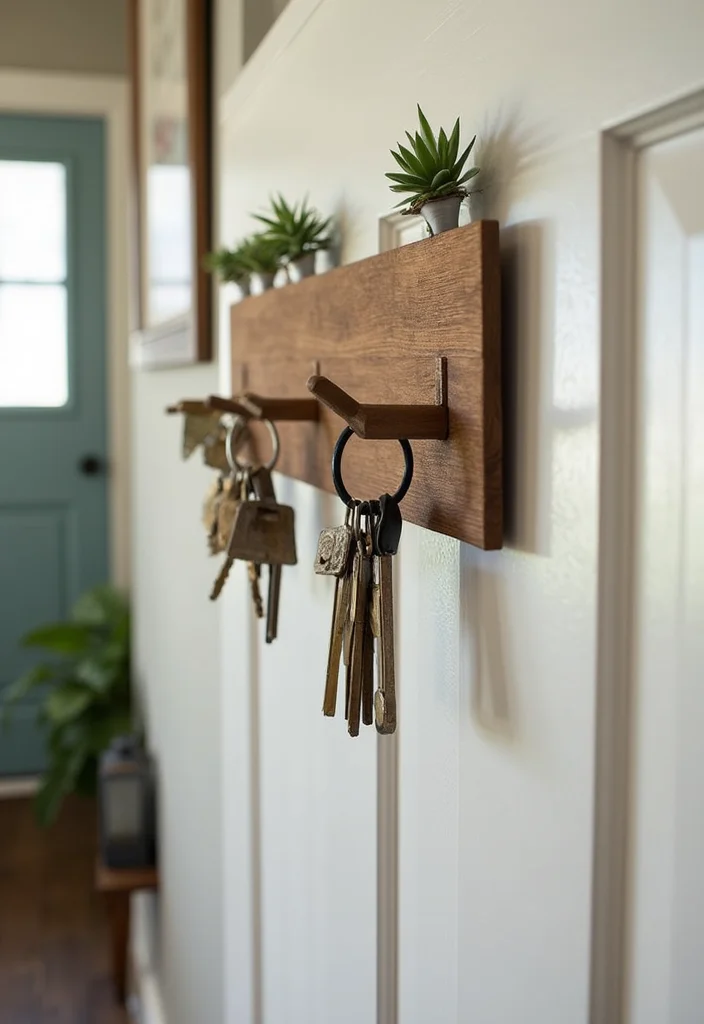
Stay organized in style with a popsicle stick key holder. This easy project keeps your keys in one place and adds a decorative touch to your entryway. Start with a base made from glued sticks, laying them out in a fun design. Attach small hooks or nails to hang your keys. Paint or stain it to suit your decor. It’s a practical solution that looks great!
Personalize it with your family name or fun designs for a unique touch. Place near the door for easy reach. Teach kids to hang their keys to build a routine. It makes everyday life feel clear and friendly.
• Use hooked accents for key spots
• Choose personalized lettering for charm
• Pick painted or stained finishes for style
• Add durable mounting for safety
It welcomes guests with tidy, friendly vibes.
17. Message Board
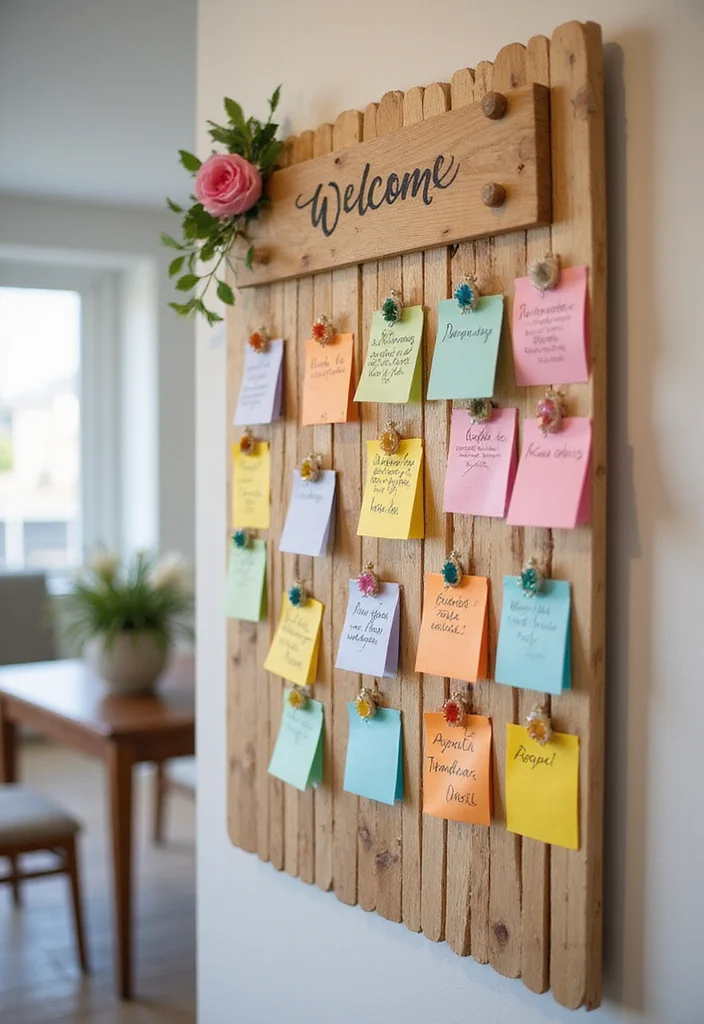
Share notes and reminders with a popsicle stick message board. This fun project is perfect for families to keep organized while adding a pop of creativity. Glue sticks in a rectangular shape to create a base, then attach a corkboard or fabric in the middle for posting notes. You can paint it in your favorite colors and decorate it with embellishments. It’s a great way to keep everyone in the loop!
Glue sticks in a rectangular shape to create a base, then attach a corkboard or fabric in the middle for posting notes. You can paint it in your favorite colors and decorate it with embellishments. It’s a great way to keep everyone in the loop!
• Use rectangular frame for base
• Choose corkboard insert for notes
• Pick colorful push pins for flair
• Add family design touches for charm
Family stays connected with a warm, creative display.
18. Gift Boxes

Gift boxes from sticks add eco charm. Wrap gifts in a unique, eco-friendly box made from sticks. Glue sticks into a sturdy box shape and add a lid that fits snugly. Paint or wrap with ribbon to finish. These boxes can be reused for storage.
Finish with a ribbon for a neat look. Store them for later gifts or storage. It shows you care about the planet and the people.
• Use box-shaped frames as gift boxes
• Choose reusable materials for sustainability
• Pick seasonal colors for variety
• Add removable lids for easy access
These boxes make presents stand out and last beyond the moment.
19. Animal Figurines
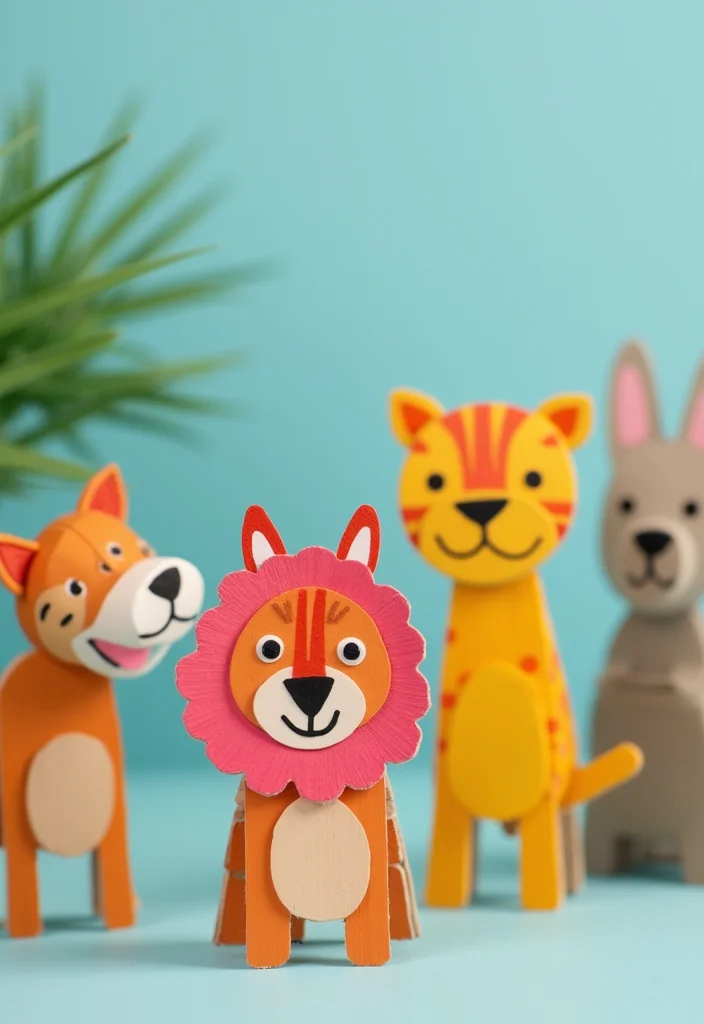
Whimsy comes alive with popsicle stick animal figurines. Shape the bodies from sticks, then add legs, ears, and tails. A coat of color and tiny details bring them to life. They’re great as decorations or small playthings.
Use simple silhouettes to keep it easy for kids. Make a family group for display. Let kids help with painting for pride. They become cheerful, friendly decor.
• Use simple animal silhouettes for easy crafting
• Choose bright paints for character
• Pick glue-friendly shapes for stability
• Add mixed sizes for playful display
These figurines spark smiles and invite imagination.
Conclusion
Crafting with popsicle sticks is not only a fun way to spend your time, but it also opens up endless possibilities for home decor.
From practical items like storage caddies to whimsical creations like animal figurines, these projects offer something for everyone. Whether you’re crafting alone or with loved ones, you’re bound to enjoy the creativity and satisfaction that comes from making something unique. So gather your materials and start your DIY journey today!
Frequently Asked Questions
What Are Some Easy Popsicle Stick Projects for Kids?
If you’re looking for fun and engaging activities for kids, popsicle stick projects are a fantastic choice! Some easy crafts include creating mini picture frames, fun popsicle stick puppets, or colorful coasters. Kids will love the hands-on experience, and these projects can help enhance their creativity while being budget-friendly and perfect for DIY home decor!
How Can I Use Popsicle Stick Crafts for Home Decor?
Popsicle stick crafts can transform your living space into a charming haven! You can create stunning wall art, stylish shelves, or even unique vases. The beauty of these DIY home decor ideas is that they are not only easy to make but also allow you to express your personal style at a fraction of the cost of store-bought decor.
What Supplies Do I Need for DIY Popsicle Stick Crafts?
Getting started with DIY popsicle stick crafts is simple! You’ll need basic supplies like popsicle sticks, glue, scissors, and paint or markers for decoration. Optional items include embellishments like glitter, beads, or fabric. With these materials, you can explore countless creative craft projects that are fun for all ages!
Are There Any Budget-Friendly Decor Ideas Using Popsicle Sticks?
Absolutely! Popsicle sticks are an incredibly budget-friendly option for decor. You can create beautiful table centerpieces, personalized gift boxes, or even a custom mirror frame without breaking the bank. These projects not only save money but also add a personal touch to your home decor!
Can I Customize My Popsicle Stick Crafts for Different Themes?
Definitely! One of the best parts about popsicle stick crafts is their versatility. You can easily customize your projects to match any theme, whether it’s seasonal, holiday, or personal interests. Use paint, fabric, or other materials to reflect your chosen theme, making each piece a unique addition to your home decor.