
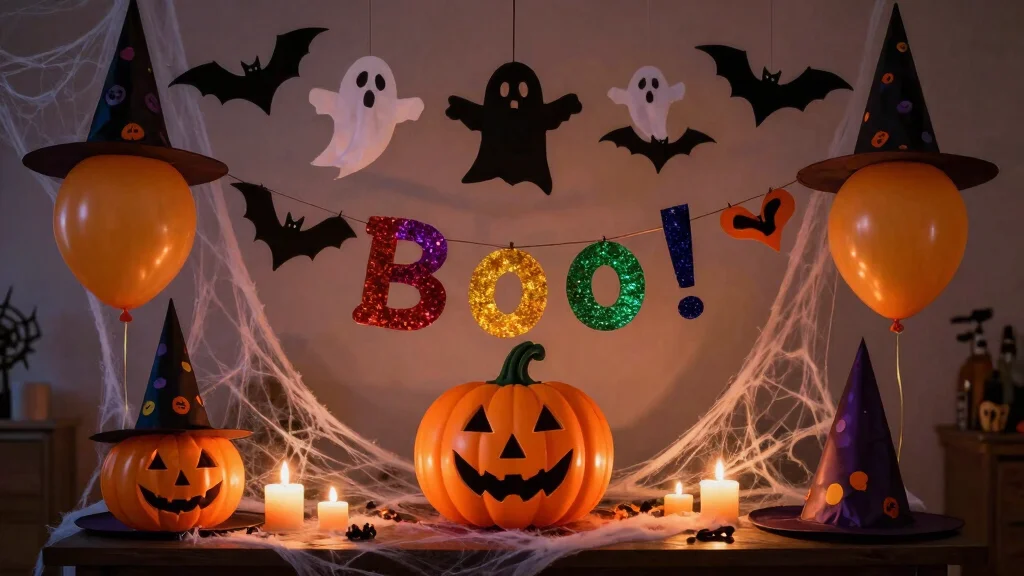
Halloween is just around the corner, and that means it’s time to get creative with some spooky home decor! As the leaves change and the nights grow longer, many of us start craving that festive vibe. This post is here to help you dive into the world of DIY Halloween decorations without breaking the bank. If you’re someone who loves decorating for the season but wants to keep it budget-friendly, you’re in the right place!
Whether you’re a crafting novice or a seasoned DIYer, this guide is made for families looking to add some fun and fright to their homes. You’ll discover 20 amazing projects that can be made with supplies from Dollar Tree. These ideas are not only affordable but also simple enough for the whole family to get involved. From creepy candle holders to ghostly garlands, you’ll find everything you need to transform your space into a haunted haven.
Get ready for a Halloween that’s full of creativity and fun! You’ll gain inspiration and practical tips that will help you whip up decorations that are both spooky and charming. So grab your glue guns and let’s jump into these spooky budget projects that will make your home scream Halloween!
Key Takeaways
– Discover 20 DIY Halloween decoration projects using affordable supplies from Dollar Tree.
– Get step-by-step instructions for crafting spooky decor that the entire family can enjoy.
– Learn how to create unique pieces like haunted picture frames and spooky silhouettes without spending a lot.
– Find practical tips that simplify the crafting process and make it easy to decorate your home for the season.
– Embrace the spirit of Halloween with budget-friendly crafts that bring festive cheer to your space.
1. Creepy Candle Holders
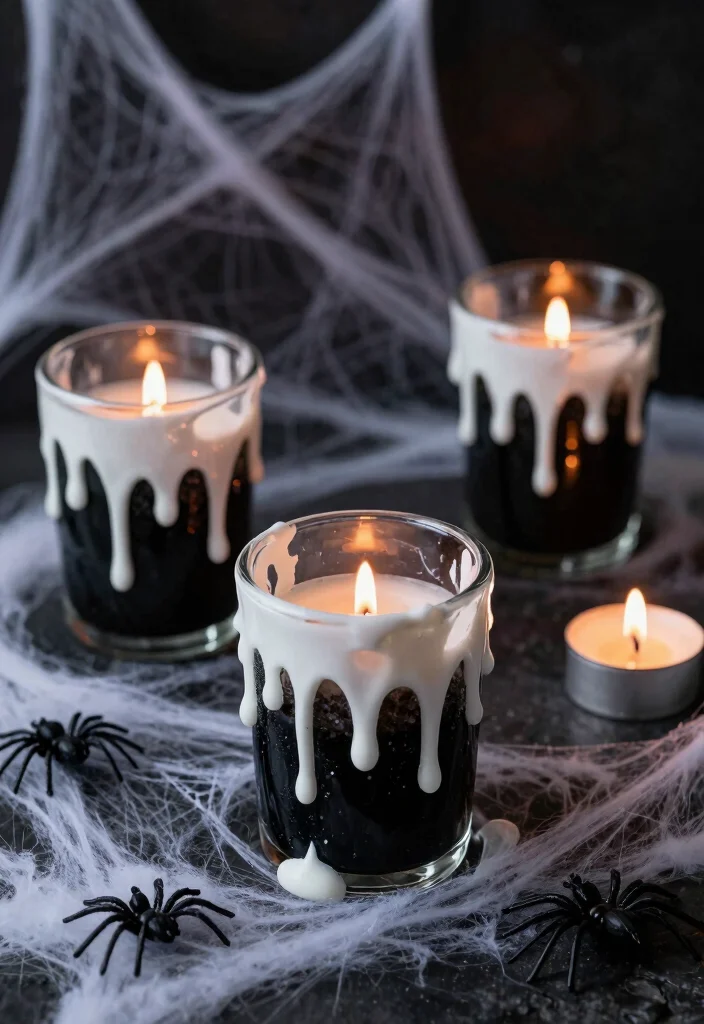
Embrace the eerie charm of Halloween by transforming Dollar Tree glass candle holders into spooky works of art. The combination of flickering candlelight and creative embellishments offers a haunting ambiance perfect for any haunted setting. By adding paint and a touch of glue, you can mimic the look of dripping wax and cobwebs, creating a centerpiece that draws the eye and sets the tone. Imagine these candle holders illuminating your dining table or gracing a darkened corner of your home, each one casting an enchanting glow.
To bring this haunting idea to life, you don’t need to break the bank. Look for budget-friendly supplies at local craft stores or repurpose items from around your home. This project not only enhances your decor but also connects to the broader trend of using DIY elements to create personalized home environments.
Consider these steps to craft your spooky candle holders:
– Paint the inside of the holders with black acrylic paint.
– Use a hot glue gun to create wax drips around the rim.
– Apply white paint on the drips for an eerie effect.
– Place a tea light candle inside for illumination.
These candle holders provide a thrilling focal point, while the interplay of textures and materials adds depth to your Halloween decor.
2. Haunted Picture Frames
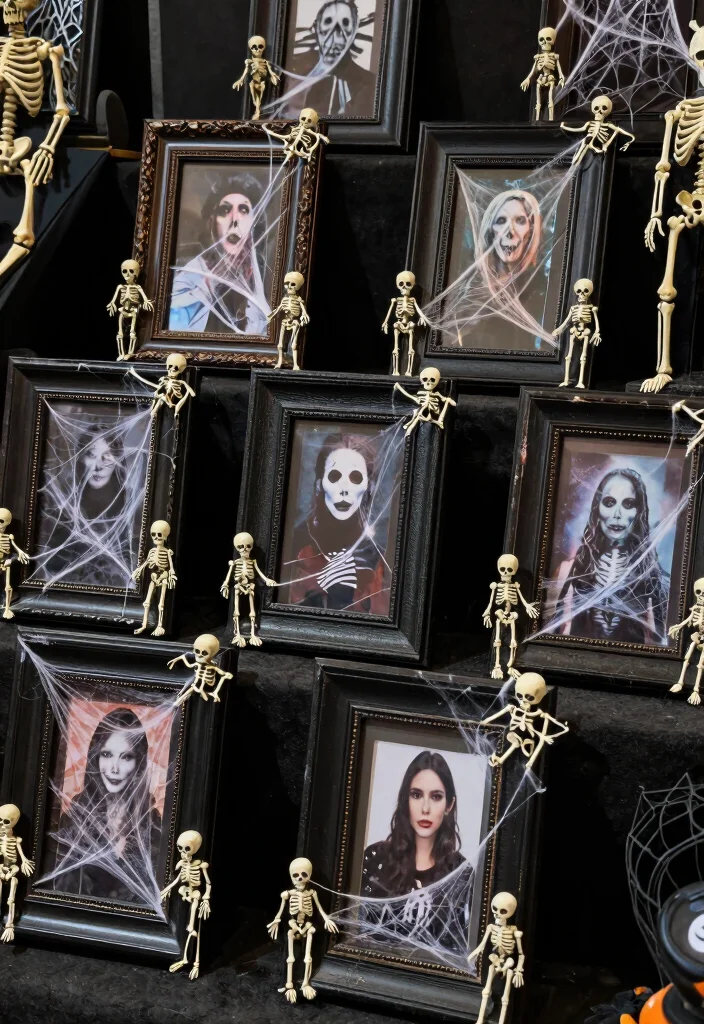
Revitalize your old picture frames by giving them a spooky makeover with a haunted twist. Dollar Tree frames offer an affordable canvas to display your favorite Halloween memories or eerie art. A simple coat of paint and some creative embellishments can turn these frames into eye-catching decor that reflects your festive spirit. Picture these framed pieces hanging on your walls, showcasing the fun and fright of the season.
To achieve this haunted look, gather supplies from your local Dollar Tree or explore thrift stores for hidden gems. This DIY project aligns with the trend of upcycling and personalizing your space, making it both budget-friendly and fun.
Here are some steps to create your haunted picture frames:
– Clean the frames with glass cleaner before painting.
– Spray paint the frames black and let it dry.
– Attach plastic skeletons or other creepy embellishments with hot glue.
– Insert Halloween-themed photos or spooky prints.
This creative project not only adds to your home’s aesthetic but also showcases your Halloween enthusiasm in a fun and decorative way.
3. Spooky Silhouettes
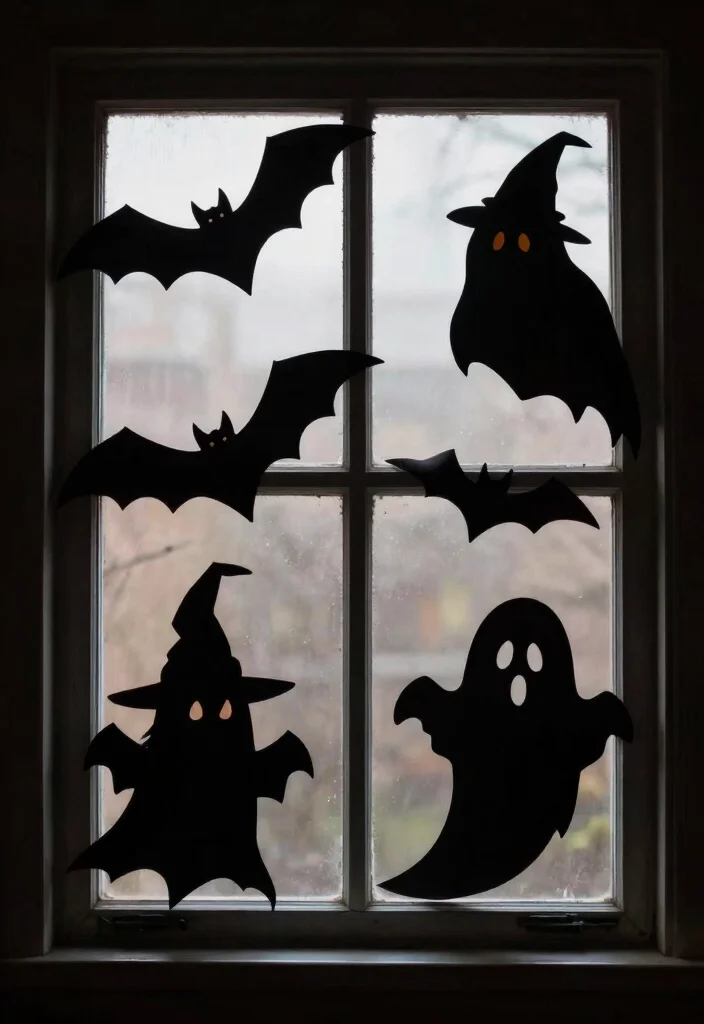
Crafting spooky silhouettes for your windows or walls offers a delightful way to enhance your Halloween decor. Using black poster board from Dollar Tree, you can easily cut out shapes like witches, bats, and ghosts that create a haunting atmosphere. These silhouettes are an effective way to bring the spirit of Halloween into your home, mesmerizing passersby and delighting guests.
For a budget-friendly project, gather your materials from Dollar Tree or your craft stash at home. The simplicity of this DIY aligns perfectly with the current trend of incorporating playful and imaginative elements into seasonal decor.
Follow these steps to create your spooky silhouettes:
– Choose shapes like witches or ghosts to cut out.
– Carefully cut the shapes from black poster board.
– Use tape to adhere them to windows or walls.
– For added drama, backlight them with a lamp for eerie shadows.
These silhouettes add depth and intrigue to your Halloween decor, making your space look delightfully haunted.
4. Ghostly Garlands
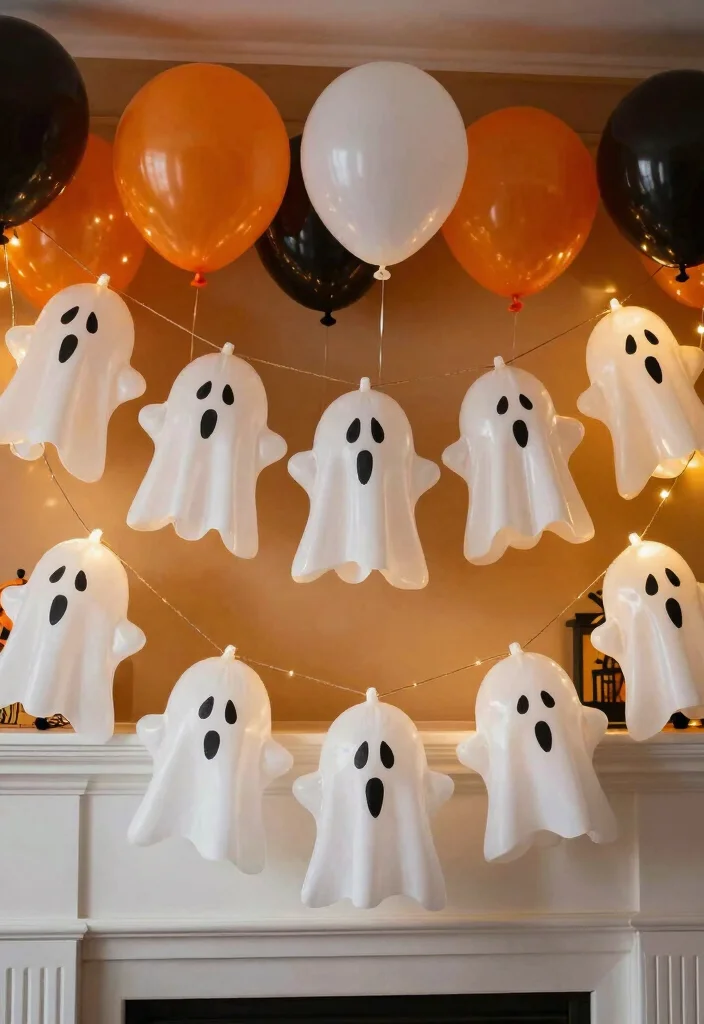
Infuse whimsy into your Halloween decor with charming ghostly garlands that are a breeze to create. Using materials from Dollar Tree, you can craft playful ghost decorations that flutter in the breeze, adding a lighthearted touch to your festivities. Imagine these garlands draping across doorways or mantels, welcoming guests with a delightful spooky charm.
For a budget-friendly crafting experience, gather your supplies from Dollar Tree, which makes this project accessible and easy. This fun DIY aligns perfectly with the trend of making your home feel festive and personalized during the holiday season.
Here’s how to create your ghostly garlands:
– Inflate white balloons and tie them.
– Draw ghostly faces on the balloons with a black marker.
– Attach balloons to string or twine spaced evenly.
– Drape the garland across your mantel or doorframe.
This playful decoration adds a cheerful yet spooky vibe, making it perfect for family-friendly Halloween celebrations.
5. Wicked Wreaths
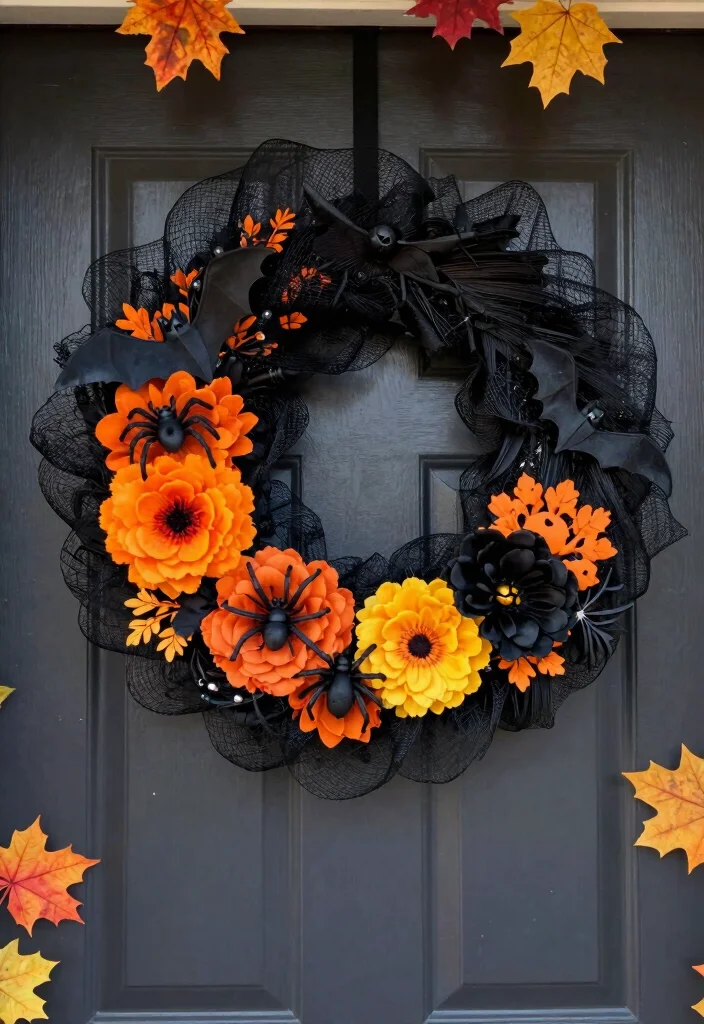
Greet your guests with a wicked wreath that perfectly captures the essence of Halloween. With simple supplies from Dollar Tree, you can create a wreath adorned with spooky elements like bats, spiders, and faux flowers. This enchanting decoration not only adds a festive touch to your front door but also sets a playful tone for your entire home.
To create your wicked wreath, look for materials at Dollar Tree or repurpose items you already have. This DIY aligns with the trend of welcoming guests with personalized and thematic decor, making it an enjoyable project to undertake.
Follow these steps to craft your wicked wreath:
– Wrap a wreath form with black mesh or tulle.
– Secure it with hot glue for a neat finish.
– Decorate with plastic spiders, bats, and faux flowers using glue.
– Attach a ribbon loop for easy hanging.
This wreath invites a delightful spookiness, ensuring your Halloween decor is both festive and inviting.
6. Potion Bottles
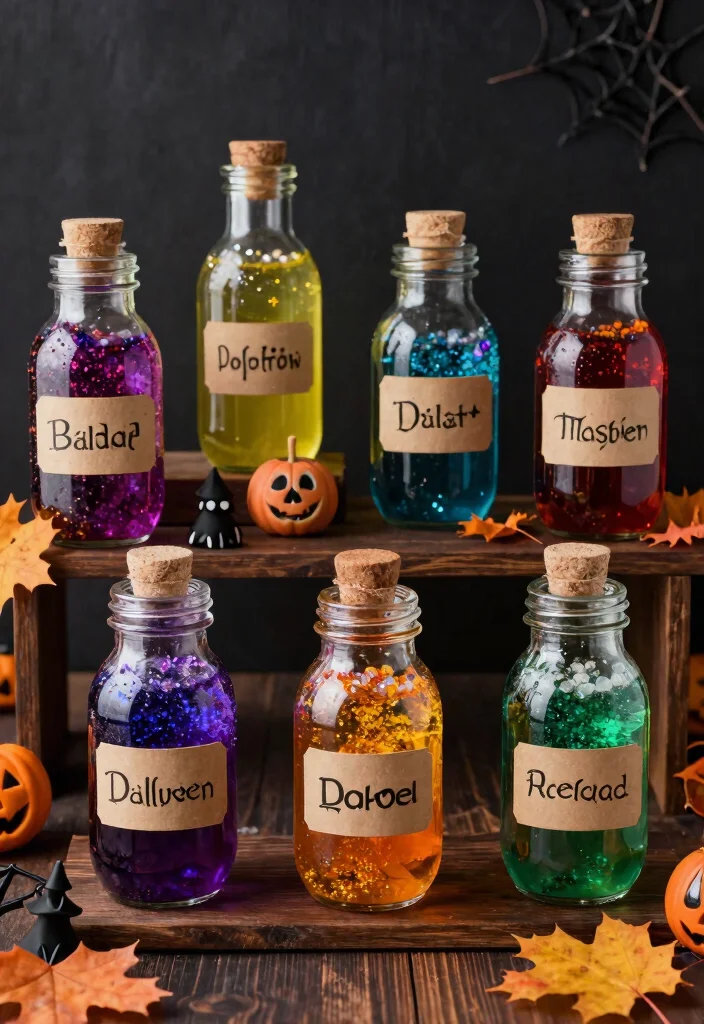
Transform plain glass jars into enchanting potion bottles that bring a mysterious flair to your Halloween decor. This simple project encourages creativity, enabling you to customize each bottle with unique contents and labels. Imagine these mystical jars lined up on a shelf or used as centerpieces, captivating the attention of all who see them.
For this magical DIY, source materials from Dollar Tree or use items you already have at home. This project embraces the trend of personalized decor that tells a story, making it both unique and engaging.
Here’s how to create your potion bottles:
– Fill glass jars with distilled water and add food coloring or glitter.
– Design spooky labels like “Witch’s Brew” for each jar.
– Attach labels using twine for a rustic look.
– Display them as enchanting decor or fun conversation starters.
These potion bottles not only evoke a whimsical allure but also enhance your Halloween festivities with their charm.
7. Mummy Mason Jars
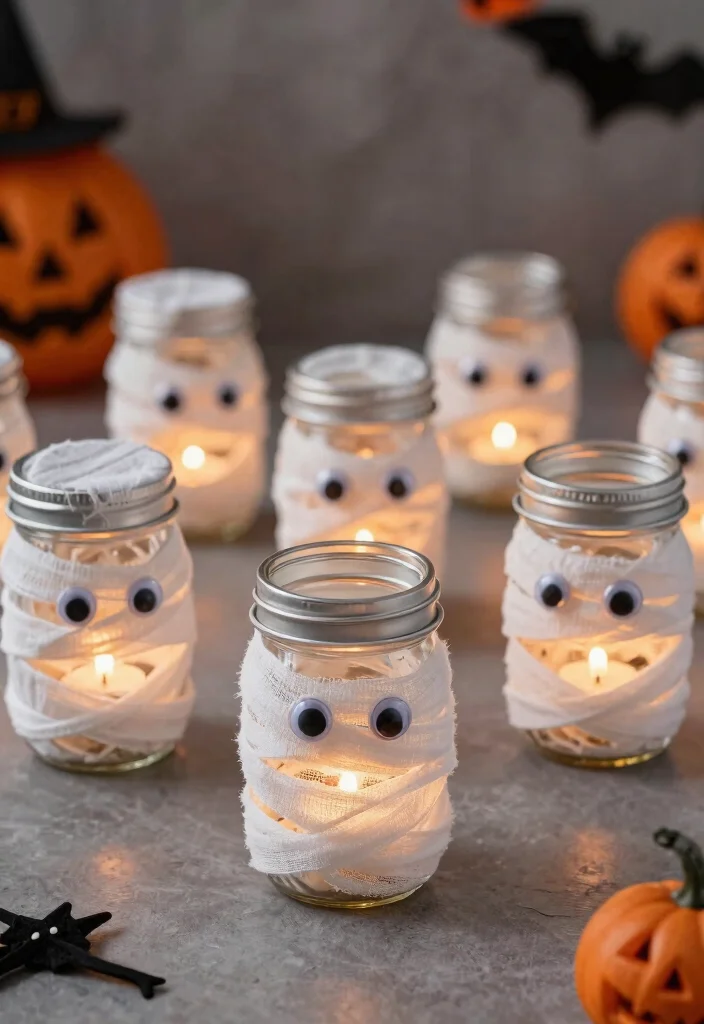
Craft adorable mummy jars that serve as delightful decorations for treats or spooky lighting. This easy project utilizes mason jars and simple materials from Dollar Tree, making it a fun activity for all ages. Picture these cute mummies scattered around your home, bringing smiles and a festive spirit to your Halloween celebrations.
To create your mummy jars on a budget, gather materials from Dollar Tree or get creative with what you have. This project reflects the trend of combining fun crafting with seasonal decor, making it an excellent choice for families.
Here’s how to make your mummy jars:
– Wrap mason jars with white cheesecloth, leaving gaps for eyes.
– Secure gauze with hot glue for stability.
– Attach googly eyes for a playful look.
– Add a tea light for a spooky glow.
These mummy jars add a charming touch to your Halloween decor, making them perfect for family gatherings and celebrations.
8. Pumpkin Balloons
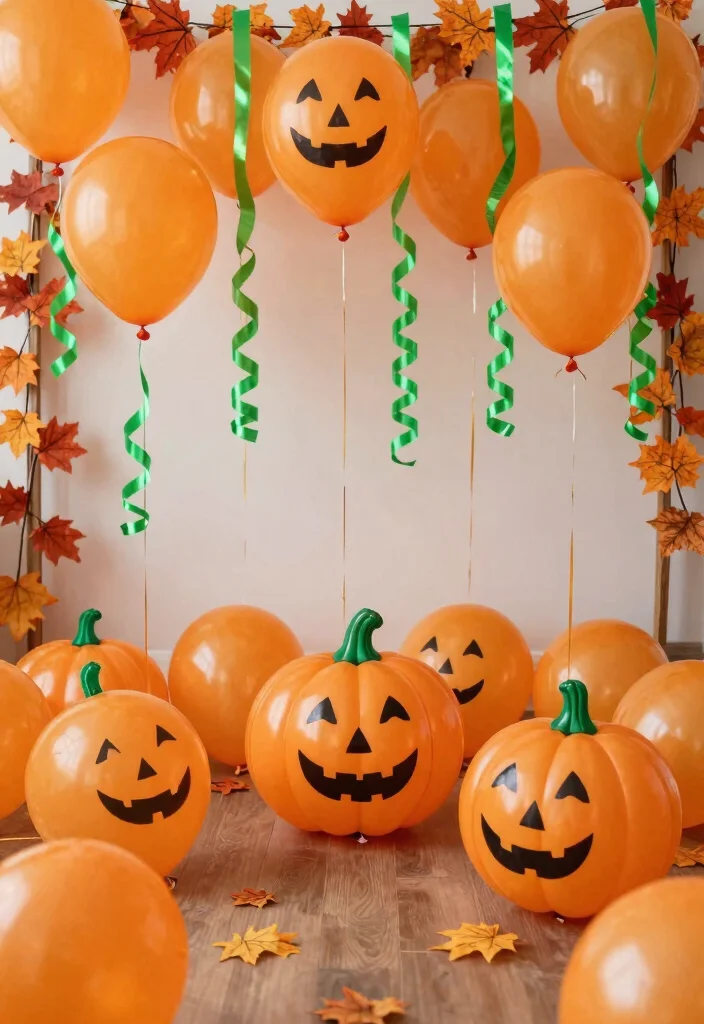
Brighten up your Halloween festivities with cheerful pumpkin balloons that add a festive flair to your decor. Using orange balloons from Dollar Tree, you can create quick and delightful decorations that capture the spirit of autumn. Imagine these playful pumpkins scattered around your home, filling the air with a joyful Halloween atmosphere.
For this simple and fun project, gather your materials from Dollar Tree. This DIY embraces the trend of creating lively and colorful decor that celebrates the season without overspending.
Follow these steps to create your pumpkin balloons:
– Inflate orange balloons and tie them securely.
– Optionally, draw jack-o-lantern faces with a marker.
– Attach green curling ribbon to mimic pumpkin vines.
– Scatter them around the room or cluster them for a centerpiece.
These playful decorations offer an easy way to bring the spirit of Halloween into your home, ensuring your space feels festive and inviting.
How To Choose the Best Dollar Tree Halloween Decor Projects
Choosing the right Dollar Tree Halloween decor projects can be both fun and budget-friendly. With so many options available, it’s essential to consider several factors to ensure you’ll create spooky decorations that truly enhance your home. Here are some tips to help you make the best choices:
1. Determine Your Theme
Before diving into crafting, think about the theme you want for your Halloween decor. Do you prefer classic spooky elements like ghosts and goblins, or something more whimsical? Choosing a theme early on will guide your project selection and color palette, making your decor cohesive and visually appealing.
2. Consider Space and Size
Think about where you plan to display your decorations. Are you creating a centerpiece for your dining table or sprucing up the front porch? Measure the space to ensure your projects won’t overwhelm or get lost in the area. This consideration will help you select projects that fit well and make an impact without cluttering your space.
3. Evaluate Material Options
Dollar Tree offers a variety of materials for your Halloween crafts, from plastic and foam to fabric and paper. Consider durability and ease of handling. For example, foam pumpkins might be easier to carve or paint than real ones. Think about whether you want decorations that can be reused year after year or if you prefer one-time-use items for an easy cleanup.
4. Check Your Crafting Skills
Be honest about your crafting abilities. Some projects may require advanced skills or special tools that you might not have. Choose DIY projects that match your comfort level. If you’re new to crafting, start with simpler ideas like spooky silhouettes or painted mason jars. As you gain confidence, you can tackle more complex projects like creating a haunted picture frame.
5. Budget Wisely
Although Dollar Tree is known for low prices, it’s easy to overspend on supplies. Create a budget before you shop and stick to it. Calculate the costs of materials you’ll need for each project. If you find a project is too pricey, consider modifying it to use items you already have at home or searching for alternative supplies at Dollar Tree.
6. Assess Practicality and Time
Think about how much time you have to dedicate to your projects. Some crafts might take longer than expected, especially if they involve drying time or multiple steps. Assess whether you want quick projects for last-minute decor or are willing to invest time in more elaborate creations. This will help you plan your crafting schedule effectively.
Pro Tip: Create a mock-up or sketch of your ideas before buying materials. This visual plan can help you stay organized and ensure your projects align with your theme and space!
With these tips, you’ll be well-prepared to choose the best Dollar Tree Halloween decor projects. Enjoy the crafting process, and remember that the most important part is to have fun and get creative!
9. Scarecrow Table Decor
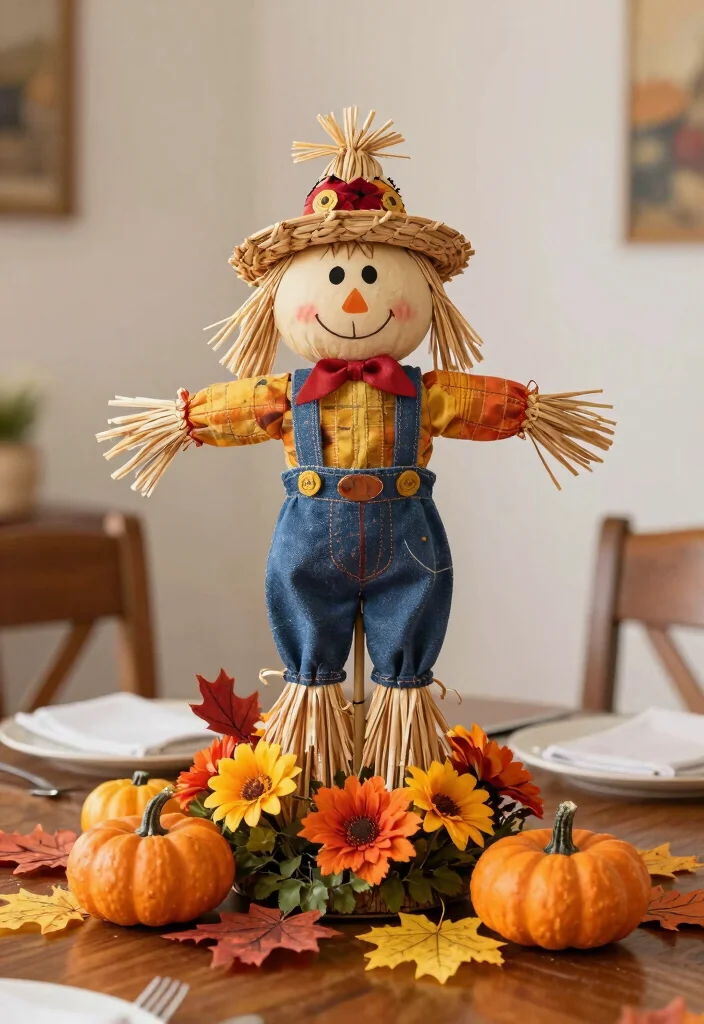
Create charming scarecrow table decor that beautifully blends Halloween with fall themes. Using simple supplies from Dollar Tree, you can craft a fun centerpiece that celebrates the season while adding a touch of whimsy to your table setting. Picture this playful scarecrow welcoming guests and enhancing the festive atmosphere of your gatherings.
To assemble your scarecrow decor on a budget, source materials from Dollar Tree or explore your craft stash at home. This DIY project combines the joy of crafting with the trend of seasonal decor, making it a delightful activity for families.
Here’s how to create your scarecrow table decor:
– Attach craft sticks to small straw hats for the body.
– Cut fabric scraps and glue them onto the sticks as clothes.
– Use hot glue to add artificial flowers for extra charm.
– Place your scarecrow on the dining table for a festive display.
This scarecrow decor brings rustic charm to your Halloween celebrations, adding a playful and inviting touch to your home.
10. Witch’s Broomsticks
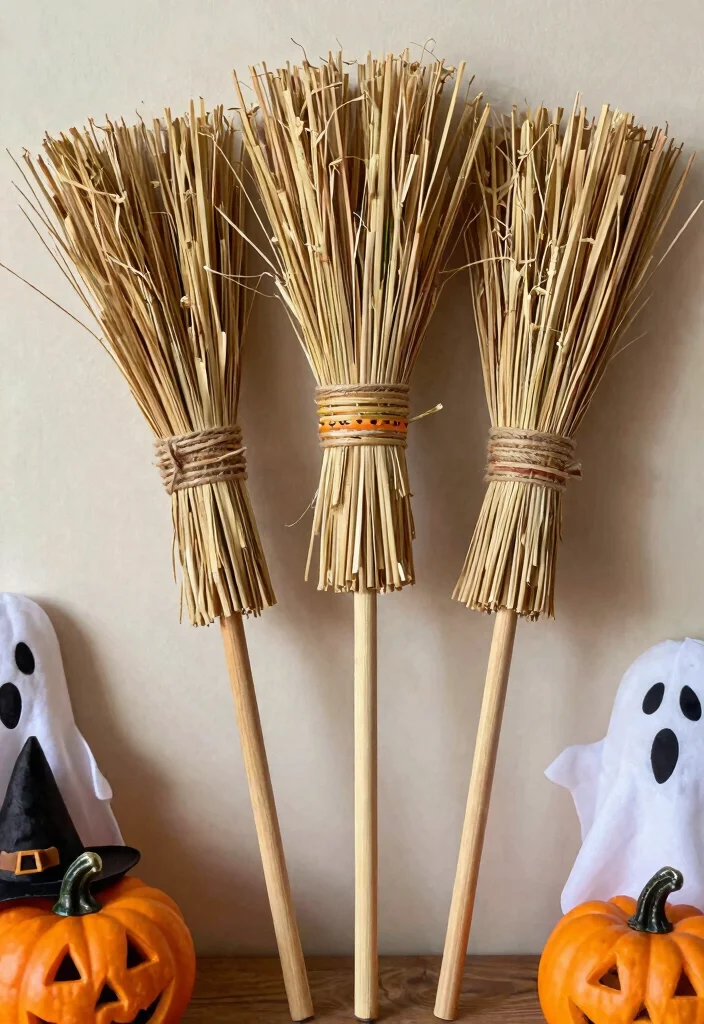
Invite a sense of whimsy into your Halloween decor with charming DIY broomsticks that serve as both decor and playful party props. With just a few dollar items, you can create delightful broomsticks that add a magical touch to your celebrations. Imagine these broomsticks adorning your home or being used for fun photo opportunities during your Halloween festivities.
To create your broomsticks affordably, gather materials from Dollar Tree or your craft collection. This project embraces the trend of playful decorations that spark creativity and joy during the holiday season.
Here’s how to assemble your witch’s broomsticks:
– Paint the dowels to match your decor (optional).
– Cut craft straw or broom corn for the broom bristles.
– Secure the straw to one end of the dowel with twine.
– Display your broomsticks for decor or use them for fun activities.
These broomsticks add a delightful charm to your Halloween decor, providing smiles and laughter for all who see them!
11. Spider Web Table Runner
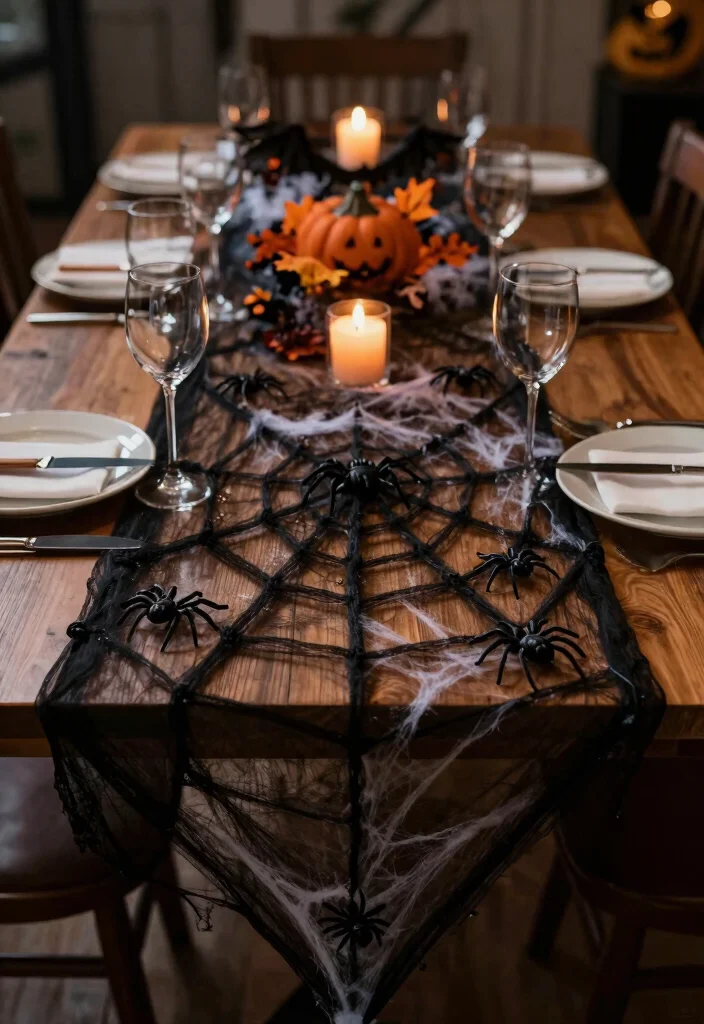
Set the stage for spooky gatherings with an eerie spider web table runner that enhances your Halloween dining experience. Using simple materials from Dollar Tree, this project is quick and impactful, creating an inviting yet haunting atmosphere for your meals. Picture this creepy table runner draping across your dining table, adding an engaging focal point for your festivities.
For a budget-friendly project, gather your materials from Dollar Tree or explore what you have on hand. This DIY aligns with the trend of creating memorable dining experiences that embrace the spirit of the season.
Here’s how to create your spider web table runner:
– Cut black tulle or mesh into a long strip.
– Drape it across the table for a natural, web-like appearance.
– Scatter plastic spider decorations on top for added effect.
This spooky table runner elevates your Halloween dining experience, combining elegance and a touch of fright for your gatherings.
12. Trick-or-Treat Bags
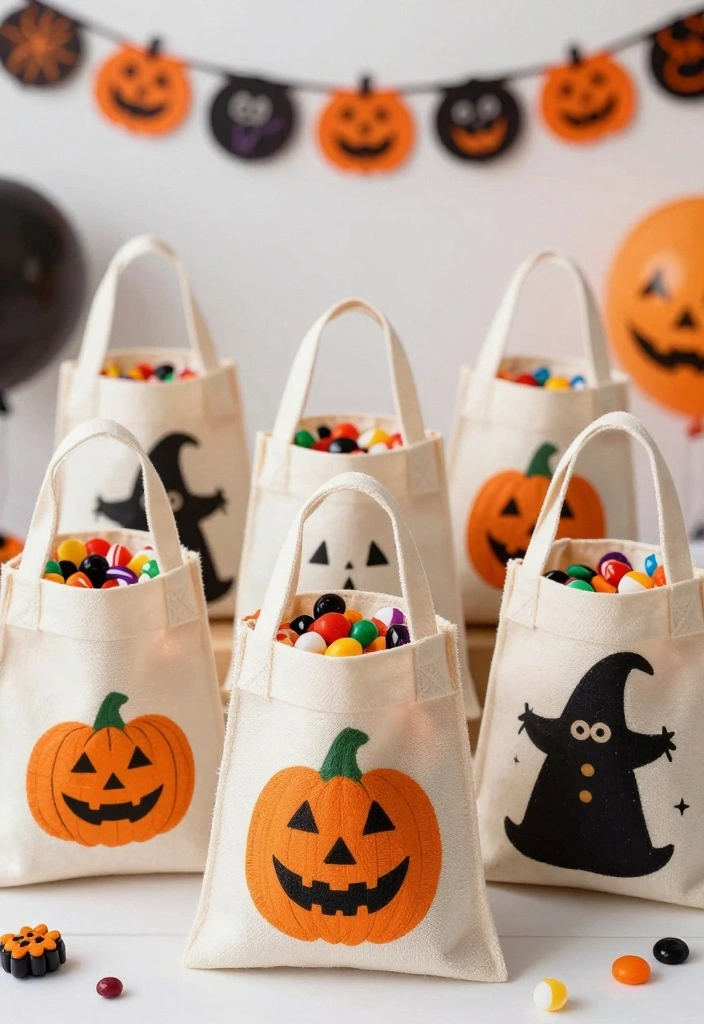
Craft personalized trick-or-treat bags that kids will love using on Halloween night. With supplies from Dollar Tree, you can create unique bags that reflect the festive spirit of the season while being playful and practical. Imagine the delight on children’s faces as they carry these colorful bags filled with goodies during their trick-or-treating adventures.
To create these bags affordably, look for canvas or tote bags at Dollar Tree and gather your decorating supplies. This DIY project embraces the trend of personalizing holiday experiences, making it a fun way to engage with the Halloween spirit.
Follow these steps to create your trick-or-treat bags:
– Choose plain canvas bags to decorate.
– Use fabric paint or markers for Halloween designs.
– Optionally, use stencils for precise shapes.
– Fill the bags with treats for eager little witches and goblins.
These personalized trick-or-treat bags not only showcase creativity but also add a fun touch to Halloween celebrations, making them a hit with kids.
13. Spooky Table Centerpiece
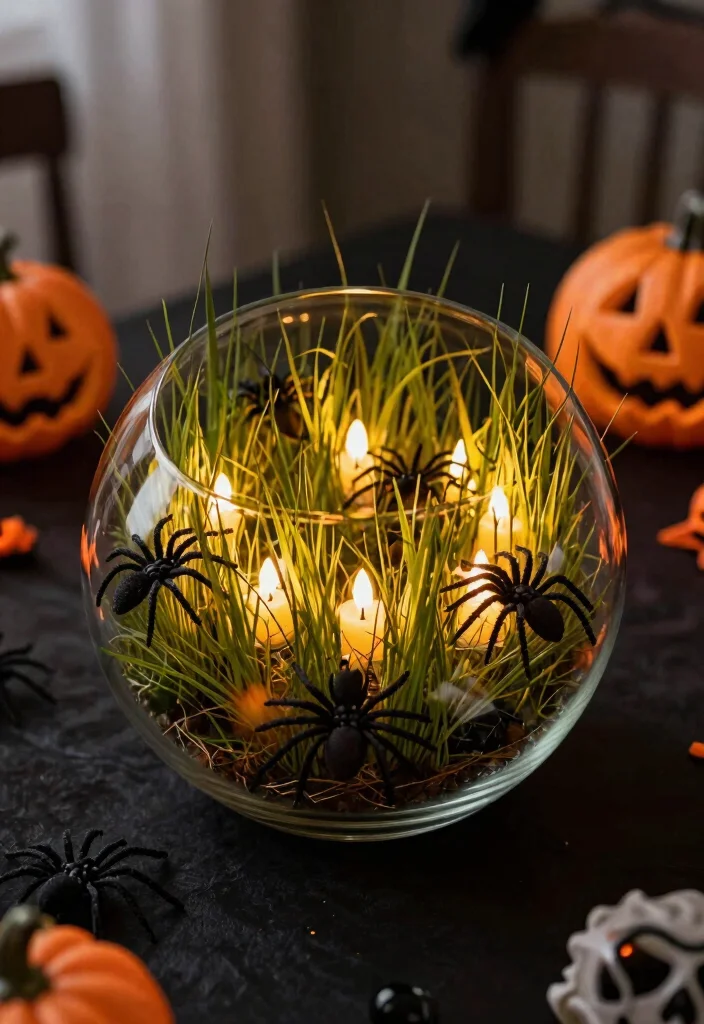
Create an eye-catching centerpiece for your Halloween gatherings with a spooky table display that’s simple to assemble. Using items from Dollar Tree, you can craft a centerpiece that captures the essence of Halloween and adds a festive flair to your dining table. Imagine this spooky centerpiece drawing compliments from your guests as they enjoy their meals.
For an affordable and engaging project, gather materials from Dollar Tree or your home crafting supplies. This DIY reflects the trend of creating captivating focal points that enhance holiday celebrations.
Here’s how to create your spooky table centerpiece:
– Fill a glass vase or bowl with fake grass or moss.
– Arrange plastic spiders or bats throughout the display.
– Place LED candles or fairy lights inside for illumination.
This spooky centerpiece not only sets the mood for Halloween but also evokes conversation and delight among your guests during festive gatherings.
14. Halloween-Themed Pillow Covers
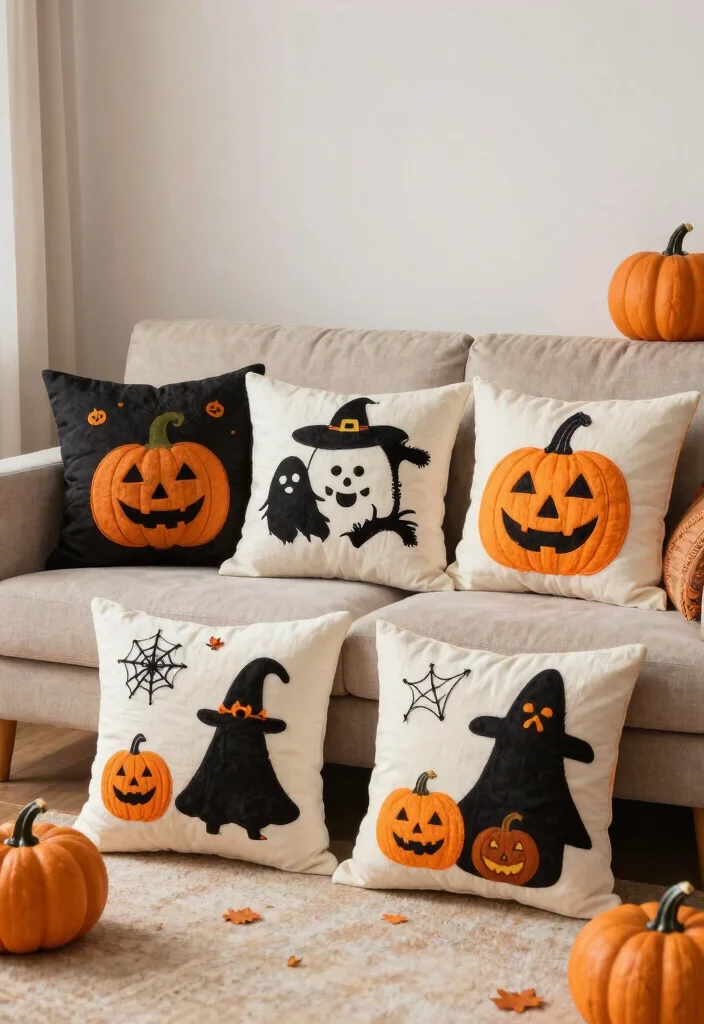
Add a cozy and festive touch to your Halloween decor with DIY pillow covers that reflect the spirit of the season. Using plain pillow covers and supplies from Dollar Tree, you can create fun and whimsical designs that brighten up your home. Imagine these cheerful pillow covers enhancing your living space, inviting warmth and celebration during the holiday season.
For this budget-friendly project, gather your materials from Dollar Tree or use existing pillow covers. This DIY aligns with the trend of personalizing home decor to create a festive atmosphere during Halloween.
Here’s how to create your Halloween-themed pillow covers:
– Start with clean, blank pillow covers laid out flat.
– Use fabric paint or markers for Halloween designs.
– Optionally, utilize stencils for accurate shapes.
– Place the covers on your pillows and arrange them around your home.
These custom pillow covers not only add comfort but also infuse your space with festive cheer, making your home feel warm and inviting.
15. Halloween-Themed Coasters
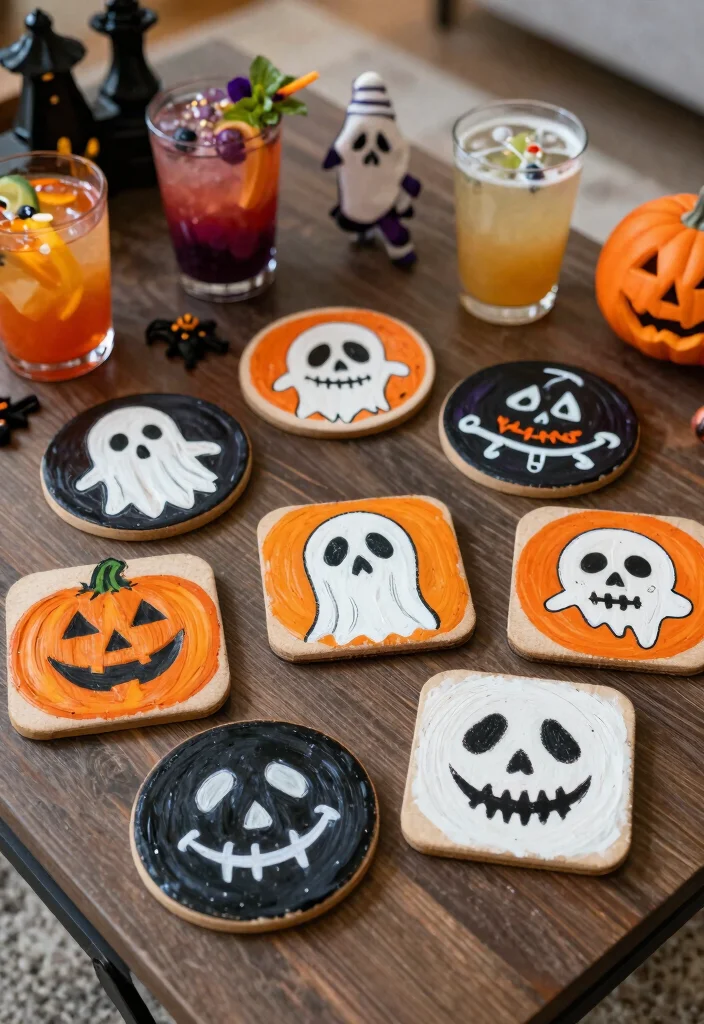
Protect your surfaces while celebrating Halloween with DIY themed coasters that impress your guests. This project is both practical and fun, using Dollar Tree supplies to create coasters that add a festive touch to your decor. Imagine these coasters brightening up your coffee table during Halloween gatherings, offering functional charm to your celebrations.
For an affordable and creative project, gather materials from Dollar Tree or repurpose items at home. This DIY reflects the trend of combining functionality with festive decor, making it a perfect addition to your Halloween festivities.
Here’s how to create your Halloween-themed coasters:
– Start with plain cork coasters to decorate.
– Use acrylic paint or markers for spooky designs.
– Optionally, apply a sealer to protect your artwork.
– Display your coasters on the coffee table or bar area.
These coasters are both functional and festive, making them a delightful addition to your Halloween gatherings.
16. Skeleton Hand Decorations
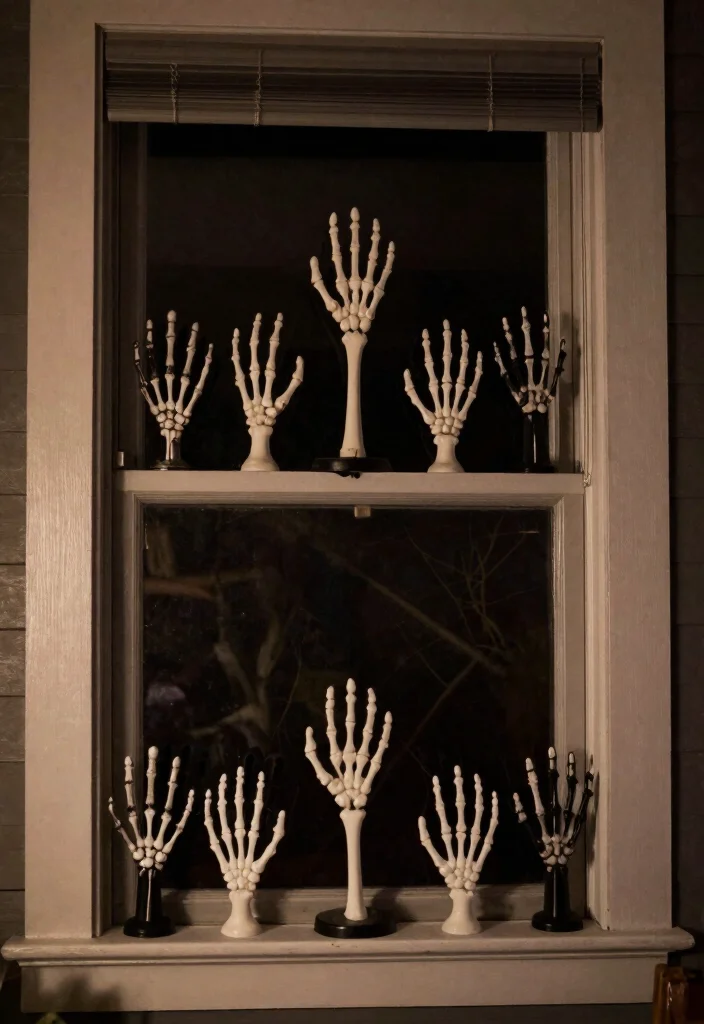
Enhance your Halloween decor with eerie skeleton hand decorations that are both creepy and whimsical. Using simple materials from Dollar Tree, you can create striking skeleton hands that can be placed around your home or featured in a spooky display. Picture these hands adding a touch of fright, captivating your guests with their playful charm.
For a budget-friendly project, gather your materials from Dollar Tree or craft supplies you already own. This DIY aligns with the trend of incorporating unique and playful elements into your seasonal decor, making it a fun activity to undertake.
Here’s how to create your skeleton hand decorations:
– Choose plastic skeleton hands for your project.
– Optionally, paint them for an aged appearance.
– Use string or wire if you want to hang them.
– Place the hands around your home for a spooky effect.
These skeleton hands add a flair of creativity to your Halloween decor while being budget-friendly and fun.
17. Halloween-Themed Garden Stakes
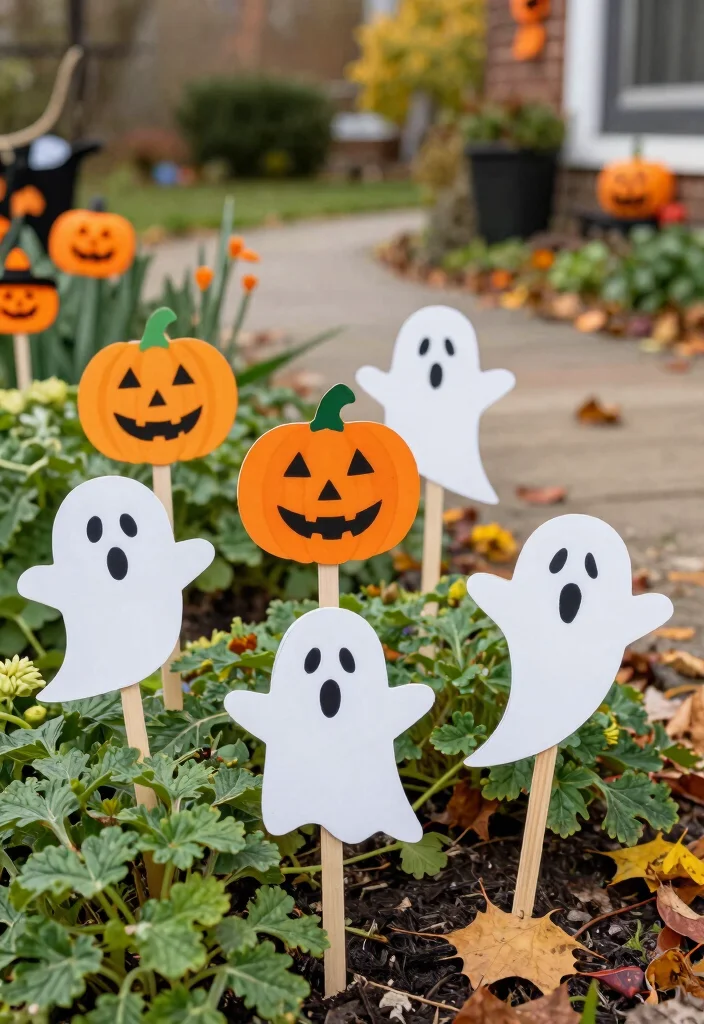
Spruce up your garden or front yard with easy-to-make Halloween-themed garden stakes. This delightful project extends your Halloween decor outdoors, giving your yard a festive vibe. Imagine these whimsical stakes welcoming trick-or-treaters and adding charm to your outdoor space during the spooky season.
For a budget-friendly crafting experience, gather materials from Dollar Tree or your craft supplies at home. This DIY reflects the trend of bringing holiday spirit outdoors, creating an inviting atmosphere for all.
Here’s how to create your Halloween-themed garden stakes:
– Use a wooden stake or dowel as the base.
– Decorate foam or cardboard shapes with Halloween designs.
– Attach the shapes to the top of the stakes with glue.
– Drive the stakes into your garden or yard for whimsical displays.
These garden stakes not only brighten your outdoor space but also create a welcoming ambiance for all your Halloween visitors.
18. Decorative Halloween Jars
Repurpose glass jars into spooky decorative pieces that can hold treats or serve as unique decor. This simple project allows you to add a personal touch to your Halloween festivities, using items from Dollar Tree to create one-of-a-kind jars. Imagine these jars adding character to your Halloween gatherings, each one telling its own story.
For a fun and affordable crafting experience, gather materials from Dollar Tree or utilize jars you already have at home. This DIY embraces the trend of personalizing decorations to enhance the festive spirit.
Here’s how to create your decorative Halloween jars:
– Add googly eyes to the outside of the jars for a playful touch.
– Wrap ribbon or twine around the neck of the jar.
– Label the jars with fun names like “Witches’ Snacks.”
– Fill with goodies or use as decorative pieces.
These decorative jars serve dual purposes as treats and festive decor, adding a delightful touch to your Halloween celebrations.
19. DIY Halloween Shadow Box
Create a spooky shadow box that showcases your Halloween spirit with items from Dollar Tree. This imaginative project allows you to customize your decor and tell a unique story within a box. Picture this shadow box becoming a focal point in your home, drawing attention and sparking conversations during Halloween gatherings.
For this budget-friendly craft, gather materials from Dollar Tree or your home crafting supplies. This DIY reflects the trend of creating engaging and personalized decor for the holiday season.
Here’s how to create your Halloween shadow box:
– Remove the back of the shadow box or deep picture frame.
– Arrange Halloween-themed decorations inside creatively.
– Secure them with glue or tape for stability.
– Replace the back and display it on a shelf or table.
This shadow box adds a captivating touch to your Halloween decor, becoming a delightful highlight in your home.
20. DIY Halloween Lanterns
Brighten your Halloween nights with charming DIY lanterns made from Dollar Tree supplies. These lanterns are perfect for creating outdoor decor or enhancing the indoor ambiance during spooky celebrations. Imagine these lanterns casting a warm and inviting glow, guiding your guests through the night with their enchanting light.
For an affordable and creative project, gather materials from Dollar Tree or use jars you already have at home. This DIY aligns with the trend of crafting unique decor that elevates the Halloween experience.
Here’s how to create your DIY Halloween lanterns:
– Paint the outside of glass jars or lanterns with black paint.
– Embellish with Halloween-themed stickers or ribbon.
– Place an LED tealight inside for a magical touch.
– Arrange lanterns around your home or on your porch.
These DIY lanterns create a warm and inviting glow, enhancing the atmosphere of your Halloween celebrations.
Conclusion
As Halloween approaches, these 20 DIY Dollar Tree projects will help you create a homemade haunted house that’s both charming and budget-friendly. From spooky silhouettes to whimsical pumpkin balloons, your decor will impress both trick-or-treaters and guests alike.
Get your crafting supplies ready, gather the family, and dive into these festive projects that will make this Halloween unforgettable.
Frequently Asked Questions
What are the best Dollar Tree projects for Halloween decorations on a budget?
Kick off with a cohesive home decor DIY plan and a simple color palette (orange, black, and white). Dollar Tree projects like black foam sheets, plastic cobwebs, mini skulls, mason jars, LED tea lights, and picture frames are perfect for budget-friendly crafts. Create a spooky vignette by grouping a few pieces: paint a jar for a lantern, dress up a frame with printable Halloween art, and add cobwebs for texture. Pro tip: repurpose clear ornaments into lanterns with string lights, and reuse items across multiple projects to maximize impact without breaking the budget. With careful arrangement, you can achieve several Halloween decorations using Dollar Tree projects.
How can I turn everyday Dollar Tree finds into spooky home decor for fall?
Start with a theme, then customize with simple techniques. For example, select a haunted-woodland or haunted-hospital vibe. Gather frames, jars, black foam, paper silhouettes, and fabric. Steps: 1) prep surfaces; 2) paint items in your palette; 3) cut silhouettes from black cardstock and mount on frames or boards; 4) create cobwebs from white cheesecloth or cotton; 5) add LED lights or flicker candles. The result is a cohesive set of Halloween decorations that feel bigger than their price tag. This approach fits budget-friendly crafts and seasonal DIY ideas.
Are these 20 projects family-friendly and easy for kids to help with?
Absolutely. Most projects use simple supplies and kid-friendly steps. Opt for tasks like painting, cutting black cardstock shapes, arranging jars, and applying printable art. Use non-toxic paints, safety scissors for little hands, and adult supervision for any hot glue or power tools. It’s a fun way to involve the whole family in home decor DIY and budget-friendly crafts while still keeping the spooky vibe.
How do I plan and budget for a Dollar Tree Halloween decor makeover?
Start with a budget and a quick shopping list. Decide how many zones you want to decorate (entry, mantel, table, walls) and estimate cost per zone. Shop early when Halloween items hit clearance; reuse items across zones to maximize value. Create a simple timeline, gather printable art or designs, and keep a bin for leftovers. This practical approach aligns with seasonal DIY ideas and Dollar Tree projects that stay budget-friendly.
Can these projects be reused next year, and how should I store them?
Yes—many pieces can be refreshed for next year. Seal painted surfaces with a clear spray sealer, store in labeled bins, and keep a stash of batteries for LED lights. Fold or roll textiles, store cobwebs in resealable bags, and reuse frames by swapping in new printable art. With smart storage, these Halloween decorations become a repeatable part of your home decor DIY routine and a staple of your seasonal DIY ideas.