

As the holiday season approaches, I find myself craving the warmth and cheer that Christmas brings. The twinkling lights, the scent of pine, and the laughter of loved ones all fill the air with joy. But let’s be real—decorating can get pretty expensive. That’s why I put together this guide for festive decorations that won’t break the bank. With a little creativity and some budget-friendly materials from Dollar Tree, you can transform your home into a winter wonderland.
If you’re someone who loves to get crafty and wants to celebrate the season without overspending, this blog is made just for you. Whether you’re an experienced DIY enthusiast or a beginner looking to dip your toes into some creative projects, you’ll find something here. I’ve gathered 20 fun and easy Christmas Dollar Tree DIY decor projects that are not only charming but also incredibly affordable.
Get ready to dive into a world of Christmas crafts that add that perfect festive touch to your home. From stunning wreaths to delightful ornaments, these projects are designed to bring that joyous holiday spirit right into your living space. You’ll walk away with ideas that are festive, budget-friendly, and sure to impress your guests.
Key Takeaways
– Budget-Friendly Options: Discover how to create beautiful decorations using inexpensive materials from Dollar Tree, making your holiday decorating affordable and enjoyable.
– DIY Versatility: Each project is designed to fit various decor styles, so you can personalize your home with unique touches that reflect your taste.
– Easy Step-by-Step Guides: Follow simple instructions for each project, ensuring that even beginner crafters can join in on the fun without feeling overwhelmed.
– Fun Family Activities: Many of these crafts make for great family bonding experiences, allowing you to create lasting memories while crafting together.
– Creative Gift Ideas: Beyond decorating, some projects double as thoughtful, handmade gifts for friends and family, spreading holiday cheer in more ways than one.
1. Classic Pine Cone Wreath

Embrace the beauty of nature with a classic pine cone wreath that beautifully reflects the winter season. This charming project brings the outdoors to your front door, creating a warm and welcoming atmosphere for guests. Gather a bounty of pine cones—available at Dollar Tree or from your yard—and combine them with a foam wreath base, hot glue, and a touch of wired ribbon for an elegant finish.
Begin by arranging the pine cones around the foam base. Secure them with hot glue, layering them for a lush, full appearance. Once your design is complete, tie a lovely bow with the wired ribbon and attach it at the top. You can achieve this stylish wreath in less than an hour!
Tips: Add a sprinkle of faux snow or glitter for a winter wonderland effect.
What you’ll need:
– Foam wreath base
– Pine cones
– Hot glue gun
– Wired ribbon
Step-by-step:
1. Arrange pine cones around the wreath base.
2. Glue the pine cones securely.
3. Create a bow and attach it.
4. Hang and admire your work!
This wreath makes a stunning statement and serves as a perfect accent to your holiday decor, showcasing your creative flair without breaking the bank.
2. Glittery Ornaments Garland

Add a touch of sparkle to your holiday decor with a glittery ornaments garland! This delightful project is not only fun for kids but also a great way to bring festive cheer into your home. Using plastic ornaments from Dollar Tree, select colors that harmonize with your existing decor. You’ll also need jute twine, a glue stick, and loose glitter in your favorite shades.
Start by gluing the ornaments in clusters for a cohesive look. Once the glue dries, gently roll each ornament in glitter for an even coating. Finally, string the ornaments together on the jute twine, spacing them as you prefer. Hang this cheerful garland above a mantel, on a staircase, or across a window to create a joyful atmosphere.
Pro Tip: Use different sizes of ornaments for added dimension!
What you’ll need:
– Plastic ornaments
– Jute twine
– Loose glitter
– Glue stick
Step-by-step:
1. Cluster ornaments with glue.
2. Roll in glitter after drying.
3. String them onto the jute twine.
4. Hang and enjoy the sparkle!
This garland is sure to catch the eye and brighten any room, transforming your space into a festive wonderland.
How To Choose Dollar Tree Christmas Decor for Your Home
When decorating for Christmas, you want to create a warm and festive atmosphere without breaking the bank. Dollar Tree offers a wonderful selection of budget-friendly decor that can help you achieve that cozy look. Here’s how to choose the right items for your holiday home decor.
1. Define Your Style
Before you head to Dollar Tree, think about the style you want for your Christmas decor. Do you prefer traditional, rustic, or modern? Knowing your style helps you make better choices. For instance, if you love rustic decor, look for items like burlap ribbons, pinecones, and natural elements. This will create a cohesive look.
2. Set a Budget
Even though Dollar Tree items are affordable, it’s a good idea to set a budget to avoid overspending. Decide how much you want to spend on each category, like wreaths, ornaments, and other decor items. Having a budget will help you prioritize your purchases and keep your spending in check.
3. Consider Size
When selecting decor, consider the size of your space. Large decorations can overwhelm a small room, while tiny ornaments might get lost in a larger area. For example, if you’re decorating a big living room, opt for a large wreath or a statement centerpiece. Measure your space to ensure your decor makes a statement without cluttering the area.
4. Look for Versatility
Choose items that can be used in multiple ways. For example, ornaments can hang on the tree or be used in table centerpieces. A decorative basket can hold gifts or be an accent piece. This versatility allows you to get more use out of each item, making it a more worthwhile investment.
5. Check Quality
While Dollar Tree offers a variety of items, not everything is created equal. Check for quality before purchasing. Look for well-made items that will last throughout the holiday season. For example, ensure that ornaments are not cracked and wreaths are securely assembled. A little inspection goes a long way in ensuring you get good value for your money.
6. Think About DIY Potential
Dollar Tree is a treasure trove for DIY enthusiasts. Look for basic items that you can personalize or upgrade. For example, plain ornaments can be painted or adorned with glitter to match your decor theme. This adds a unique touch to your holiday decor and allows for creativity in your decorating process.
Pro Tip: Take photos of your space and decor ideas on your phone. This helps you visualize how different items will look together and ensures you stay focused while shopping.
By following these steps, you’ll choose the best Dollar Tree Christmas decor that fits your style and budget. Remember, the goal is to create a festive and inviting home that you and your guests will love. Happy decorating!
3. Snowman Mason Jar Craft

Turn ordinary mason jars into delightful snowman decorations with a few affordable supplies from Dollar Tree. This snowman mason jar craft is not only adorable but also functional, serving as charming candle holders or gift containers! Gather some mason jars, white paint, black buttons, orange felt for noses, and festive ribbons.
Begin by painting the jars white and allowing them to dry completely. Once dried, attach buttons for eyes and a mouth with hot glue, and cut the felt into small triangles for the noses. Wrap a cute ribbon around the neck of each jar for that finishing touch. These jars can be filled with fairy lights or candies, making them a wonderful holiday decoration!
Bonus: These make perfect handmade gifts!
What you’ll need:
– Mason jars
– White paint
– Black buttons
– Orange felt
– Ribbon
Step-by-step:
1. Paint the jars white.
2. Glue buttons for features.
3. Attach felt noses.
4. Add ribbon and fill as desired.
This adorable snowman jar will enhance your decor while reminding you of winter’s joyful spirit throughout the season.
4. Rustic Candy Cane Decor

Infuse your home with nostalgia by creating rustic candy cane decor that is both sweet and charming! Using supplies from Dollar Tree like red and white ribbon, wooden sticks, and hot glue, you can craft these delightful pieces in no time. This project captures the festive spirit and is perfect for displays, whether as a centerpiece or a door hanger.
Start by arranging the wooden sticks into a candy cane shape. Use hot glue to hold the pieces together and wrap the red and white ribbon around, securing the ends with more glue. Finish with small embellishments, like pine sprigs or bells, for a rustic touch. Hang or place these candy canes throughout your home for a cheerful addition.
Tip: Mix in some faux greenery for added depth!
What you’ll need:
– Wooden sticks
– Red and white ribbon
– Hot glue
– Embellishments (like bells)
Step-by-step:
1. Shape the wooden sticks into a candy cane.
2. Glue the pieces together.
3. Wrap with ribbon and secure.
4. Add embellishments.
These rustic candy canes evoke warmth and joy, making your home feel extra festive this season.
5. DIY Christmas Tree Centerpiece

Create a stunning DIY Christmas tree centerpiece that will impress your family and friends during holiday gatherings. This project is budget-friendly and customizable to match your table decor perfectly. By utilizing foam cones, ribbon, and ornaments from Dollar Tree, you’ll craft a showstopper for your dining table!
Begin by covering the foam cone with a layer of ribbon, securing it in place with hot glue. Next, attach ornaments around the cone, working from the bottom to the top. Don’t forget to add a star or bow on top for that classic Christmas touch. This centerpiece can be created in under an hour and is a fun project to do with kids!
Tip: Use different sizes of ribbon and ornaments for a more visually appealing look.
What you’ll need:
– Foam cone
– Ribbon
– Small ornaments
– Hot glue
Step-by-step:
1. Wrap the foam cone with ribbon using glue.
2. Start attaching ornaments from the bottom.
3. Add a star or bow to the top.
4. Display on your dining table.
This festive centerpiece will elevate your holiday dining experience, making every meal feel special and cozy.
6. Recycled Jar Candle Holders

Breathe new life into old jars by creating these recycled jar candle holders! This eco-friendly project adds warmth and charm to your holiday decor. Dollar Tree offers plenty of supplies to transform your jars into beautiful candle holders—just grab some paint, ribbon, and candles.
Start by washing and drying your jars thoroughly. Paint the outsides in wintery colors like white, blue, or festive red. Once dry, secure a ribbon around the neck of each jar with hot glue. Place candles inside and light them for a cozy atmosphere. For an extra festive feel, sprinkle faux snow or glitter around the rim.
Tip: Use LED candles for a safer option!
What you’ll need:
– Old jars
– Paint
– Ribbon
– Candles (LED or traditional)
Step-by-step:
1. Clean and dry the jars.
2. Paint the jars in chosen colors.
3. Add ribbon to the neck of the jars.
4. Insert candles and enjoy.
These candle holders will not only illuminate your space but also showcase your creativity through recycling!
7. Festive Holiday Pillow Covers

Revitalize your living space with festive holiday pillow covers that are easy to make and budget-friendly. Transforming your existing throw pillows with seasonal covers is a simple way to infuse cheer into your home without the need to buy new pillows. Dollar Tree often carries fabric or holiday-themed kitchen towels that work perfectly for this project!
Start by stitching or gluing the edges of the fabric to create a cover that fits your pillow snugly. Kitchen towels often come with cute seasonal prints already! Personalize your pillows with fun phrases or patterns using fabric paint or stencils. This quick project adds comfort and style to your decor, making your space feel inviting during the holidays.
Tip: Keep a mix of prints and textures for a cozy look!
What you’ll need:
– Fabric or kitchen towels
– Scissors
– Needle and thread or glue
– Fabric paint (optional)
Step-by-step:
1. Cut the fabric to the size of your pillow.
2. Stitch or glue the edges together.
3. Personalize with fabric paint.
4. Slip over your pillows and display.
These covers allow you to effortlessly transition your decor from season to season while adding a homemade touch that feels special.
8. Ornament-Adorned Light Fixture

Transform an ordinary light fixture into a festive focal point with an ornament-adorned design. This fun DIY project will surely illuminate your holiday spirit. Use a simple round light fixture and an assortment of ornaments from Dollar Tree, along with a bit of wire or ribbon for hanging.
Start by carefully removing any existing shades or covers from your light fixture. Using wire or ribbon, create loops to attach the ornaments to the fixture. Hang them at varying lengths to achieve a dynamic look. When you turn on the lights, the ornaments will catch the light beautifully, casting a magical glow around the room!
Tip: Use a mix of colors and textures for a more interesting display.
What you’ll need:
– Round light fixture
– Ornaments
– Wire or ribbon
Step-by-step:
1. Remove existing shades from the light fixture.
2. Use wire or ribbon to attach ornaments.
3. Hang ornaments at different lengths.
4. Reassemble the fixture and enjoy.
This project not only enhances your lighting but also brings the joy of the season right into your living space.
9. DIY Advent Calendar

Count down to Christmas in style with a DIY advent calendar that brings excitement to each day leading up to the holiday! This fun project is a great way to create family traditions. You can use small bags or boxes from Dollar Tree, filling them with treats or thoughtful notes.
Arrange the bags or boxes in a festive way on a wall or table, numbering them from 1 to 24. Inside, include goodies like chocolates, small toys, or messages of kindness. You can even mix in family activities for each day! This interactive calendar not only provides daily surprises but also builds anticipation for the big day.
Tip: Get creative with decorations for the bags or boxes using washi tape or stickers.
What you’ll need:
– Small bags or boxes
– Treats or activity notes
– Numbers (stickers or paint)
Step-by-step:
1. Arrange bags/boxes in numerical order.
2. Fill each with treats or notes.
3. Decorate as desired.
4. Hang or display for countdown.
This advent calendar will surely make your holiday season even more special, adding an element of fun and surprise every day.
10. Holiday-Themed Table Runner
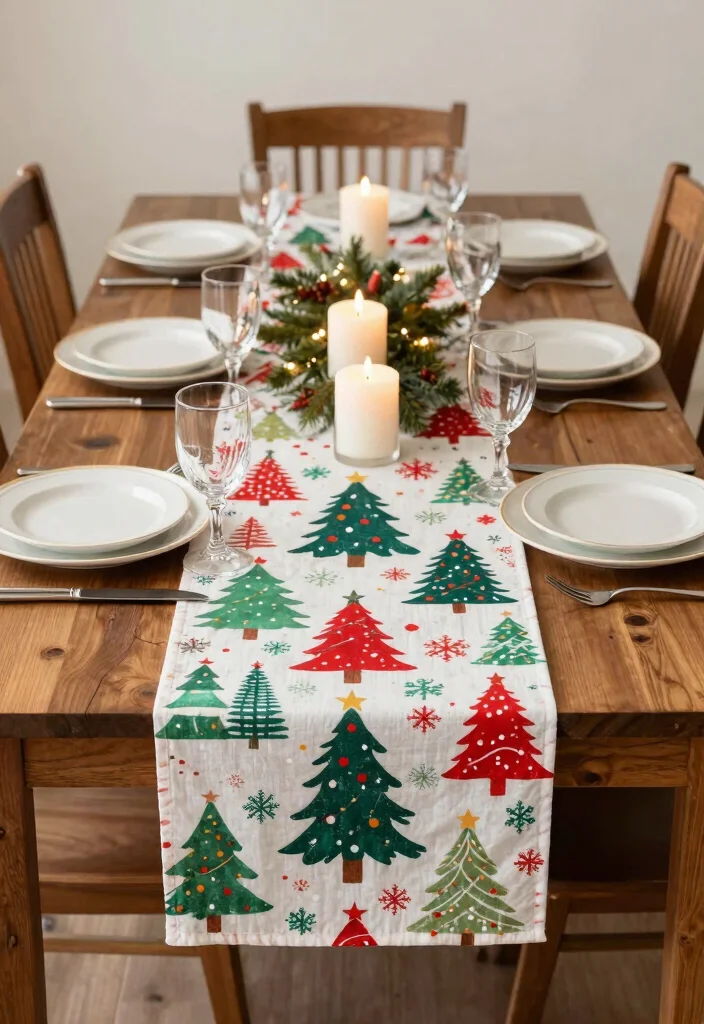
Enhance your holiday dining setup with a holiday-themed table runner that’s both stylish and easy to make. Utilizing fabric from Dollar Tree or even holiday-themed wrapping paper, you can create a beautiful centerpiece for your table. This DIY project allows you to customize the length and design, making it perfect for your space.
Begin by cutting your fabric or paper to the desired length. If using fabric, sew or glue the edges for a clean finish. For a festive touch, consider adding embellishments like pom-poms, ribbons, or even stenciled holiday designs with fabric paint. This table runner will not only protect your table but also enhance your dining experience with its vibrant colors.
Tip: Use seasonal patterns to keep it fresh and fun!
What you’ll need:
– Fabric or wrapping paper
– Scissors
– Glue or sewing kit
– Embellishments (optional)
Step-by-step:
1. Cut fabric or paper to the desired length.
2. Finish the edges if using fabric.
3. Add embellishments for flair.
4. Place on your table and enjoy.
A holiday-themed table runner will certainly add a personal touch and elevate your festive dining experience.
11. Christmas Village Display

Create a magical Christmas village display using miniature houses and figurines from Dollar Tree. This project not only adds charm to your home but also provides a lovely opportunity for family bonding as you arrange your village together! Start with a base like a wooden tray or a decorative tablecloth to set the scene.
Begin by placing the houses at varying heights to create dimension. Surround the houses with faux snow, mini trees, and holiday figures for an enchanting effect. You can even add string lights to illuminate your village at night, creating a whimsical atmosphere.
Tip: Personalize each house with paint or embellishments!
What you’ll need:
– Miniature houses
– Faux snow
– Mini trees
– Holiday figures
– String lights (optional)
Step-by-step:
1. Set up a base for your display.
2. Position the houses and arrange surrounding items.
3. Add faux snow and lights for ambiance.
4. Enjoy your holiday village!
This display becomes a conversation starter for guests, creating a delightful holiday atmosphere in your home.
12. DIY Winter Mason Jar Luminaries

Transform simple mason jars into stunning winter luminaries that brighten your home during the holiday season. This budget-friendly project adds a beautiful ambiance to your space. With a few supplies from Dollar Tree, like mason jars, battery-operated tea lights, and decorative elements, you can create these charming pieces.
Start by applying a layer of frost spray or white paint to the exterior of the jars to give them a frosted glass effect. Once dry, place a tea light inside each jar. Decorate the jars with ribbon, lace, or holiday embellishments to enhance their charm. These luminaries can be displayed along your walkway, on windowsills, or as part of your table decor.
Tip: Use different sizes of jars for added visual interest!
What you’ll need:
– Mason jars
– Frost spray or white paint
– Battery-operated tea lights
– Decorative elements (ribbon, lace)
Step-by-step:
1. Frost or paint the jars.
2. Allow to dry completely.
3. Place tea lights inside.
4. Decorate as desired and display.
These luminaries will not only light up your space but also create a warm and inviting atmosphere for holiday gatherings.
13. Snowy Pinecone Tree

Craft a snowy pinecone tree that adds a rustic touch to your holiday decor. This simple and enjoyable project utilizes pinecones from Dollar Tree or your own garden. You’ll need foam cones, hot glue, and white paint or faux snow for that delightful winter look.
Begin by using hot glue to attach pinecones around the foam cone, starting from the bottom and working your way up. Once the entire cone is covered, lightly spray with white paint or sprinkle faux snow for a charming finish. This eye-catching tree can serve as a centerpiece or adorn your mantel, bringing nature’s beauty indoors.
Tip: Finish it off with a glittery star on top!
What you’ll need:
– Foam cone
– Pinecones
– Hot glue
– White paint or faux snow
Step-by-step:
1. Glue pinecones around the foam cone.
2. Cover completely, creating a natural look.
3. Add white paint or faux snow.
4. Decorate with a star if desired.
This snowy pinecone tree will evoke the spirit of winter, showcasing the beauty of natural elements in your holiday decor.
14. DIY Holiday Greeting Cards

Spread holiday cheer by creating DIY holiday greeting cards that are personal and thoughtful. This budget-friendly project allows you to express your creativity while sending warm wishes to loved ones. Use cardstock from Dollar Tree, decorative stickers, and markers to make cards that stand out.
Begin by folding the cardstock into your desired card size. Write heartfelt messages or seasonal greetings inside using markers. Decorate the cover with stickers, drawings, or stamped designs. Each card can be unique, reflecting your personality and creativity. This small gesture will surely brighten someone’s day!
Tip: Include a personal note or photo for an added touch!
What you’ll need:
– Cardstock
– Markers
– Stickers
Step-by-step:
1. Fold the cardstock for card size.
2. Write your message inside.
3. Decorate the cover with art or stickers.
4. Send to loved ones!
These DIY greeting cards allow you to connect with friends and family, sharing the warmth and joy of the holiday season.
15. Festive Flocked Tree Ornament

Create a festive flocked tree ornament that adds a snowy touch to your Christmas tree. This delightful and easy project brings a bit of winter magic to your holiday decor. Start with clear ornaments and flocking powder from Dollar Tree, along with spray adhesive.
Begin by lightly spraying the outside of the clear ornament with adhesive. While the adhesive is still wet, roll the ornament in flocking powder to create a snowy effect. Once dry, feel free to add embellishments like ribbons or initials to personalize your ornament. Hang these on your tree or gift them to friends and family!
Tip: Mix glitter with the flocking powder for extra sparkle!
What you’ll need:
– Clear ornaments
– Flocking powder
– Spray adhesive
– Ribbons or embellishments (optional)
Step-by-step:
1. Spray adhesive on the ornament.
2. Roll in flocking powder until covered.
3. Allow to dry completely.
4. Add any desired embellishments.
These ornaments will not only beautifully decorate your tree but also serve as cherished keepsakes for years to come.
16. Jingle Bell Door Hanger
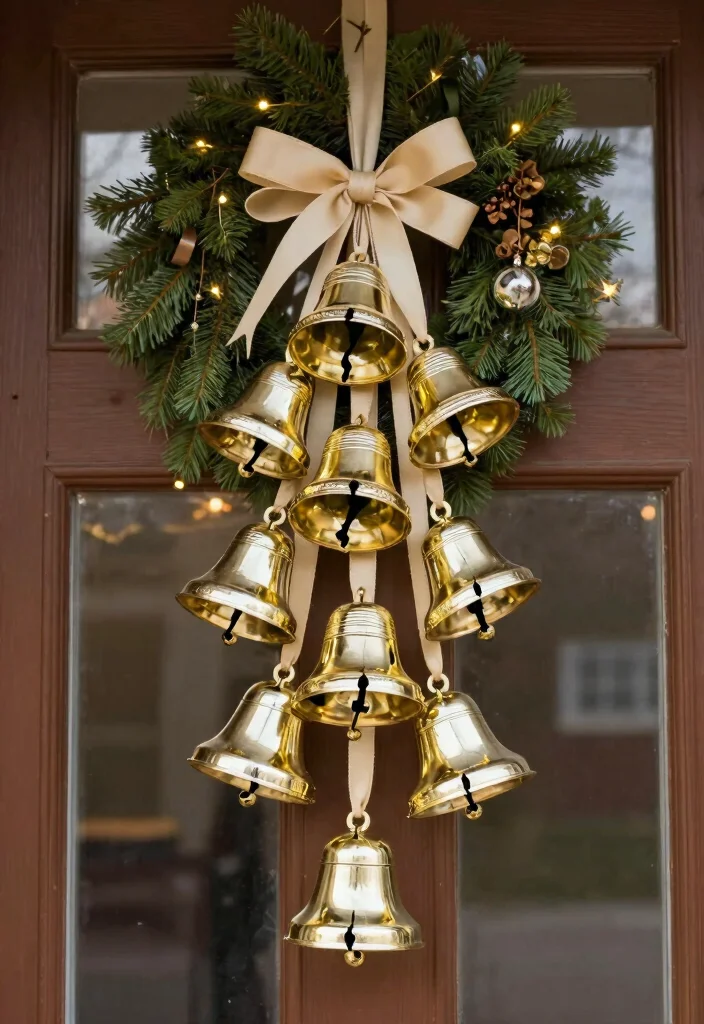
Add a cheerful touch to your decor with a jingle bell door hanger that jingles with every breeze! This simple project is a fun way to welcome guests with holiday spirit. Use jingle bells from Dollar Tree, a sturdy ribbon, and a metal ring or hoop as the base.
Start by threading the jingle bells onto the ribbon, securing them with knots to keep them in place. Once you have the desired amount of bells, tie the ribbon to the metal ring, creating a lovely hanger. Hang this project on your front door or even inside your home for a festive sound and look.
Tip: Choose bells in different sizes for added interest!
What you’ll need:
– Jingle bells
– Sturdy ribbon
– Metal ring or hoop
Step-by-step:
1. Thread jingle bells onto the ribbon.
2. Secure with knots.
3. Tie to the metal ring.
4. Hang at your door or inside.
This jingle bell door hanger will create a warm and inviting atmosphere as guests enter, ringing in the holiday joy!
17. DIY Christmas Photo Frame

Showcase your holiday memories with a DIY Christmas photo frame that adds a personal touch to your decor. This easy project allows you to highlight special moments with your loved ones during the festive season. Use a simple frame from Dollar Tree, along with festive embellishments like ribbon, glitter, and seasonal stickers.
Start by removing the backing from the frame and painting or decorating it with your chosen elements. Once you’ve created a beautiful design, insert a fun holiday photo and reassemble the frame. This personalized photo frame makes a thoughtful gift or a lovely addition to your holiday decor.
Tip: Make multiple frames for a gallery wall effect!
What you’ll need:
– Plain frame
– Paint or embellishments
– Holiday photo
Step-by-step:
1. Decorate the frame as desired.
2. Insert a holiday photo.
3. Reassemble the frame.
4. Display proudly!
This DIY photo frame will keep memories alive while serving as a beautiful decorative piece in your home during the holidays.
18. Garland of Holiday Cards
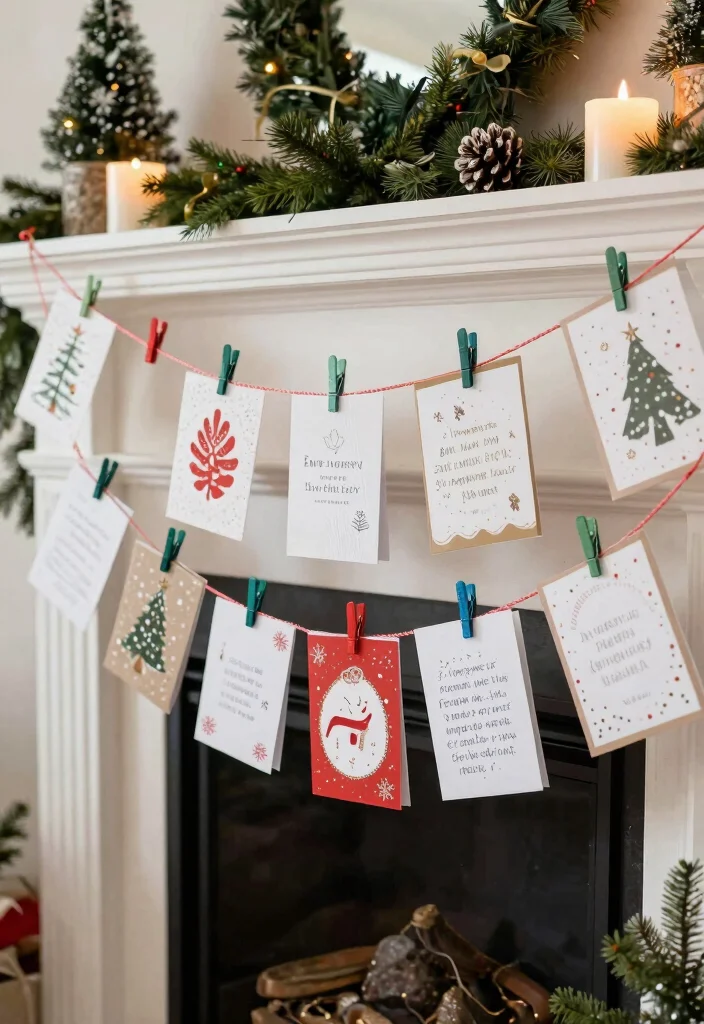
Create a garland of holiday cards that not only decorates your home but also showcases the thoughtful cards you receive from friends and family. This project is a wonderful way to display love and joy during the season! Use twine or string from Dollar Tree and small clothespins to hang your cards.
Start by measuring the length of twine you’ll need, leaving extra for hanging. Then, using the clothespins, attach the holiday cards along the twine, spacing them out as desired. Drape the garland along a mantel, window, or wall for a cheerful touch.
Tip: Mix in DIY cards for a personal flair!
What you’ll need:
– Twine or string
– Clothespins
– Holiday cards
Step-by-step:
1. Measure and cut twine to length.
2. Clip on holiday cards with clothespins.
3. Drape across your chosen area.
4. Enjoy the festive display!
This garland of holiday cards beautifies your space while keeping the spirit of connection alive, allowing you to reflect on the love shared during the season.
19. Handmade Holiday Gift Tags

Add a personal touch to your gifts with handmade holiday gift tags that are both charming and creative. This delightful project utilizes cardstock, stamps, and ribbons from Dollar Tree to uniquely tag your presents. You can make these tags in any shape, adding a special flair to your gift-giving.
Start by cutting the cardstock into tag shapes, ensuring to leave a hole at the top for string. Use stamps or markers to decorate each tag with festive messages or illustrations. Finish by attaching ribbons or twine, and your tags will be ready for your gifts! This small addition will make your presents stand out under the tree.
Tip: Make extra tags to have on hand for future gifting!
What you’ll need:
– Cardstock
– Stamps or markers
– Ribbons or twine
Step-by-step:
1. Cut cardstock into tag shapes.
2. Decorate with stamps or markers.
3. Punch holes and attach ribbons.
4. Tag your gifts and enjoy!
These handmade gift tags elevate your gifts and show your loved ones the time and thought you put into their presents!
20. Holiday-Themed Wall Art
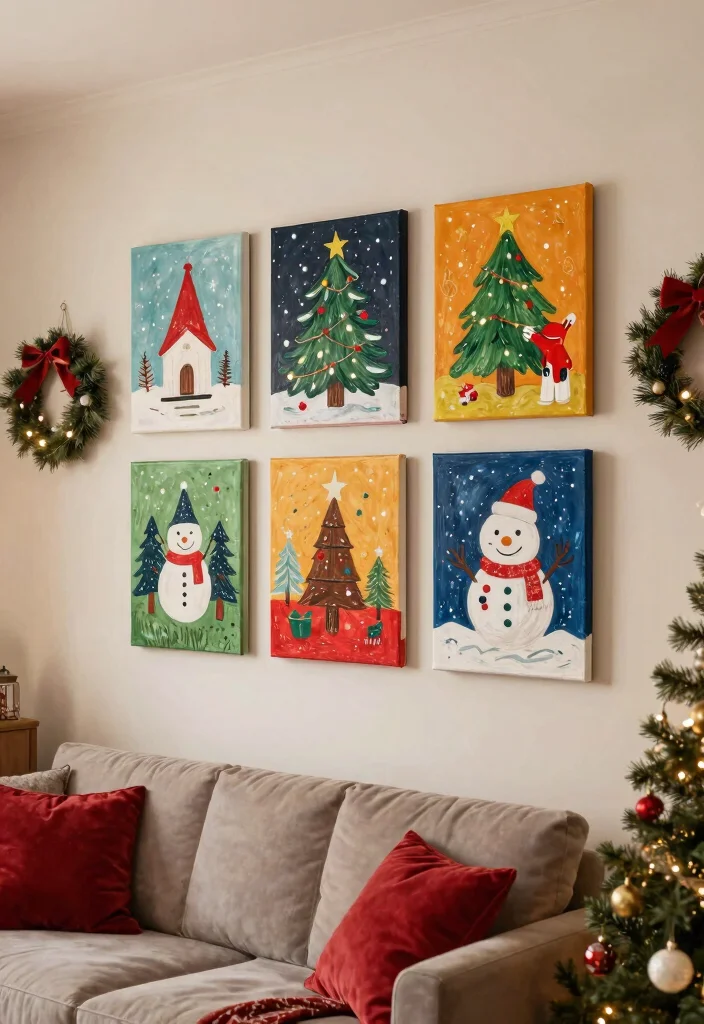
Create stunning holiday-themed wall art that brings cheer to your living space! Using canvases or wood plaques from Dollar Tree, you can craft beautiful pieces that reflect your holiday spirit. This project allows you to express your creativity and personalize your home.
Start by painting the canvas or wood with winter colors or creating festive designs using stencils or freehand techniques. Add embellishments like ribbons, glitter, or even pressed leaves to give your art a unique flair. Once dry, find the perfect spot on your wall to proudly display your creation!
Tip: Create a gallery wall with multiple pieces!
What you’ll need:
– Canvas or wood plaques
– Paints
– Embellishments (glitter, ribbons)
Step-by-step:
1. Paint the canvas or wood in your chosen colors.
2. Decorate with stencils or freehand designs.
3. Add embellishments for texture.
4. Hang on your wall and enjoy the festive view!
This holiday-themed wall art adds a personal touch to your decor, making your home feel even more special during the Christmas season.
Conclusion

Crafting decorations for the holiday season doesn’t have to be overwhelming or expensive. With these 20 DIY projects, you can create budget-friendly decor that adds a personal touch to your home. Each project not only enhances your space but also fosters the spirit of togetherness, making your holidays memorable.
So gather your supplies, invite your family to join in, and let the creativity flow. These crafts will brighten your holidays and fill your home with warmth and cheer!
Frequently Asked Questions
What are the simplest Dollar Tree Christmas wreaths or ornaments I can DIY for a budget-friendly home decor DIY upgrade?
Start with a simple wreath form or foam hoop and pick a cohesive color palette. From Dollar Tree you can grab small ornaments, greenery picks, ribbon, and spray paint.
Steps: Prep your base and trim as needed. Attach greenery and ornaments with hot glue or floral wire. Add ribbon accents and a bow, then finish with spray glitter or faux snow for extra sparkle.
This easy project is a budget-friendly decor idea and a home decor DIY that yields festive home accents for your space.
How can I turn common Dollar Tree finds into festive home accents that fit a cohesive Christmas theme?
Plan a theme palette and reuse items across projects. Choose 2-3 Dollar Tree categories (ornaments, greenery, ribbon) and stick to a motif (plaid, metallics, or burlap) for wreaths, garlands, and centerpieces.
Batch-create several pieces at once to ensure a unified look across your space. This approach maximizes Dollar Tree projects and keeps your budget-friendly decor and home decor DIY goals on track.
Which Dollar Tree supplies are must-haves for budget-friendly Christmas crafts and DIY holiday decorations?
Build a compact starter kit: hot glue gun with a few glue sticks, floral wire or pipe cleaners, scissors, and a small ruler. Then stock up on ribbon, greenery picks, small ornaments, foam shapes, paint and brushes, spray paint, and holiday signs. Add masking tape and a cutting mat if you have space. These essentials cover a wide range of Christmas crafts and DIY holiday decorations and keep your Dollar Tree projects rolling.
What’s a quick, practical plan to recreate 20 festive budget projects from this guide without breaking the bank?
Start by sorting the 20 projects into three levels of complexity. Create a 4-week plan: week 1 tackle 5 easy projects; week 2 handle mid-level pieces; week 3 build garlands and tablescapes; week 4 finish with a bigger project. Batch work by supply type to reduce store trips and reuse components across projects for a cohesive look. This keeps you in budget-friendly decor territory while delivering multiple Dollar Tree projects and DIY holiday decorations.
How can I store and maintain my DIY Christmas decor so it lasts year after year?
After the season, wipe items clean and store them in labeled, stackable bins. Keep wreaths in a breathable storage bag or box to avoid crushing; wrap fragile pieces in tissue and separate colors to prevent bleeding. Store in a cool, dry place and check periodically so your festive home accents stay ready for next year, supporting your home decor DIY goals.