
DIY Photo Wall Decor: Best Blog Guide Featuring 19 Memory-Filled Layouts
Creating a beautiful DIY photo wall can be a fun and fulfilling project. We all have those special moments captured in photographs, and what better way to showcase them than by turning a blank wall into a stunning gallery? This post was inspired by my own journey of decorating my space and the desire to share creative ideas for making your home feel more personal and inviting. Whether you’re moving into a new place, redecorating, or simply looking for ways to refresh your space, a photo wall can add warmth and character.
If you’re someone who loves to express your memories and personality through home decor, this guide is just for you. You’ll find 19 unique photo display ideas that cater to various styles and spaces. From classic grid layouts to whimsical string lights, there’s something here for everyone. These designs are not only simple to achieve but also allow you to infuse your home with a sense of nostalgia and creativity.
Get ready to dive into the world of DIY wall art! You’ll discover tips for arranging your photos, choosing the right frames, and making your photo wall a reflection of your unique story. Plus, these ideas are perfect for small spaces, ensuring that every corner of your home can tell a tale. So grab your favorite memories, and let’s start transforming your walls into a canvas of cherished moments!
Key Takeaways
– Discover 19 creative photo collage ideas to personalize your space with meaningful memories.
– Explore various layouts, including classic grids and thematic collections, tailored for small areas.
– Get practical tips on selecting frames and arranging photos to enhance your home decor.
– Learn how to incorporate lighting elements like string lights for a whimsical touch to your photo displays.
– Find inspiration for seasonal displays and rotating photo frames to keep your decor fresh and engaging.
1. Classic Grid Layout

The classic grid layout stands out as a beloved choice for photo walls, thanks to its clean lines and organized symmetry. This design creates visual harmony, showcasing your favorite memories in a structured format. For instance, using a mix of black frames with white mats against a neutral wall can elevate family portraits or travel snapshots beautifully, making them the focal point of your room.
To implement this design, start by gathering photos that resonate with each other, either through a common theme or color palette. Use painter’s tape to outline the arrangement on your wall, ensuring everything fits perfectly before you begin hanging. Mixing frame sizes can add visual interest, but keep the frame style consistent for a polished appearance.
Tips for creating a classic grid layout:
– Stick to a consistent color tone for frames to maintain harmony.
– Use a level tool to ensure all frames are hung straight.
– Consider using wall anchors for heavier frames to avoid damage.
– Leave a small gap (about 2-3 inches) between frames for balance.
This layout adapts well to various spaces, making it a versatile choice that enhances the elegance of your home.
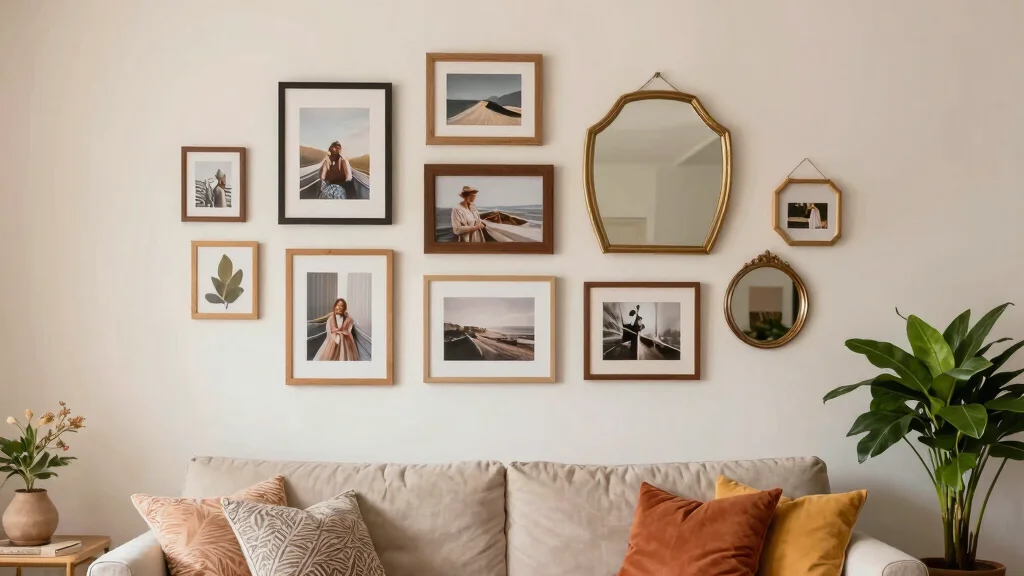
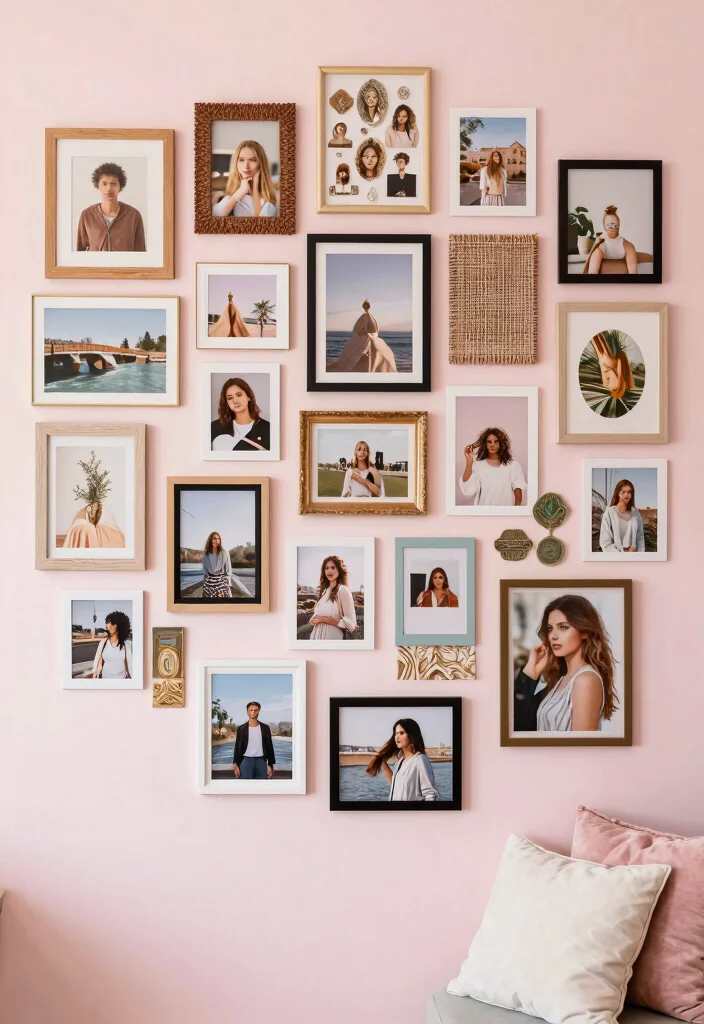
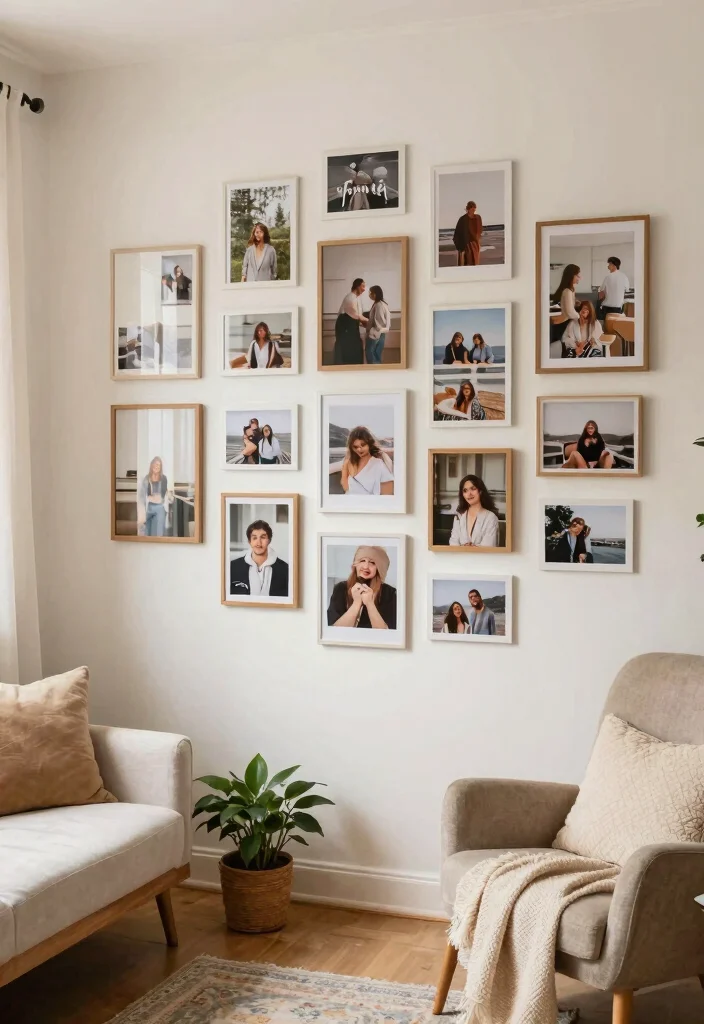
2. Asymmetrical Arrangement

Embrace creativity with an asymmetrical arrangement that breathes life into your photo wall. This playful layout invites a mix of frame sizes and shapes, creating a vibrant collage that feels both spontaneous and thoughtfully curated. Imagine larger pieces anchoring the center while smaller frames dance around them—perfect for a casual living space or hallway.
To achieve this look, start by laying out your photos on the floor to play with different placements. Overlapping frames can introduce depth, which is especially appealing in relaxed areas. This style allows for artistic expression, inviting you to mix textures and colors freely.
Layout Tips:
– Use different frame colors for a bohemian feel or stick to monochrome for a chic look.
– Incorporate non-photo items like decorative plates or wall art for interest.
– Play with spacing; some photos can be closer together while others are set further apart.
– Utilize command strips for easy rearrangement without wall damage.
This layout celebrates your individuality, ensuring every piece adds a unique story to your home’s narrative.
3. Floating Shelves Display
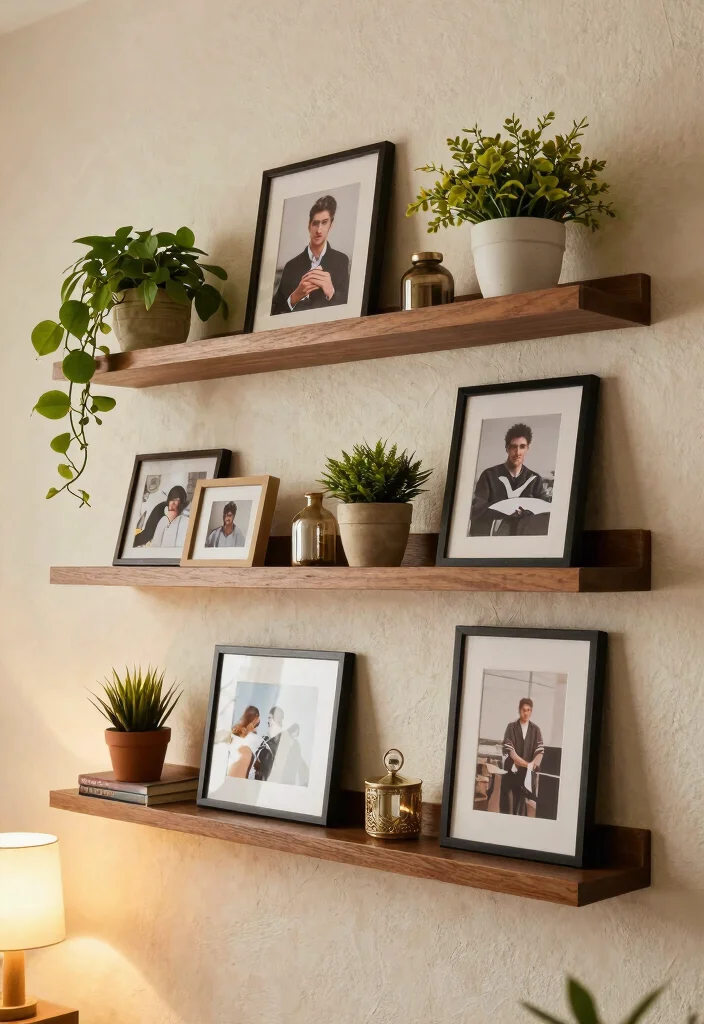
Floating shelves offer a delightful way to blend photography with decor, allowing you to display photos alongside plants, books, and cherished trinkets. This multi-dimensional approach not only showcases your memories but also creates an evolving display that can change with your mood or the seasons. Choose shelves that complement your style—think sleek white for a modern touch or rustic wood for warmth.
Arrange your photos in various orientations to create visual interest; some can be horizontal while others are vertical. This design encourages ongoing creativity, as you can easily swap out photos for fresh ones, keeping your decor dynamic.
Creative Ideas:
– Use frames with varying thicknesses to add texture.
– Mix in some personal memorabilia like concert tickets or postcards.
– Keep larger items at the center and smaller ones on the sides for balance.
– Consider lighting your shelves with string lights or spotlights for a cozy glow.
This layout not only enhances your decor but also allows for personal storytelling in an inviting manner.
How To Choose the Right Photo Wall Decor Layout
Choosing the perfect layout for your DIY photo wall can elevate your home decor and create a personalized touch. Here’s how to select the best layout for your space:
1. Assess Your Space
Start by evaluating the wall where you plan to create your photo display. Measure the dimensions to understand the available area. Knowing the height and width will help you determine how many photos you can include and what size frames will work best. A too-small layout can look lost, while a too-large one can overwhelm the space.
2. Define Your Style
Consider your overall home decor style. Do you prefer a modern, minimalist look, or something more vintage and eclectic? Your choice of frames, colors, and arrangement should harmonize with the rest of your decor. For a contemporary vibe, think about sleek frames and geometric arrangements. For a cozy feel, mix different sizes and styles of vintage frames.
3. Choose a Theme
A cohesive theme can transform your photo wall into a storytelling piece. Decide on what memories or sentiments you want to express. This could be a family photo collage, travel memories, or a seasonal display. The theme will guide the types of images you select and how you arrange them. For instance, if you’re displaying travel memories, you might include maps and souvenirs alongside your photos.
4. Frame Selection
Frames can significantly affect the look of your photo wall. Think about the materials and colors. Wooden frames add warmth, while metal frames can give a modern touch. If you are using multiple frames, ensure they complement each other. You can mix styles but keep a common element—like color or texture—to maintain cohesion.
5. Layout Design
Before hanging anything, lay out your design on the floor. Experiment with different arrangements to see what looks best. Consider balance in your layout; avoid clustering all large photos in one area. If you are going for an asymmetrical look, maintain visual balance by distributing colors and sizes evenly across the display.
6. Plan for Lighting
Good lighting can enhance your photo wall. Identify how natural light enters the room and where you might want artificial lighting. Avoid placing reflective glass frames in direct sunlight to prevent glare on your photos. Consider using LED lights or fairy lights to add a magical touch, especially in the evenings.
Pro Tip: Take a photo of your layout on the floor before you hang anything. This will serve as your reference guide, ensuring you can recreate the arrangement on the wall without any hassle!
By following these steps, you can create a photo wall that not only showcases your favorite memories but also enhances your home decor. Remember, the goal is to make your space feel inviting and personal. Enjoy the process, and let your creativity shine!
4. Map of Memories
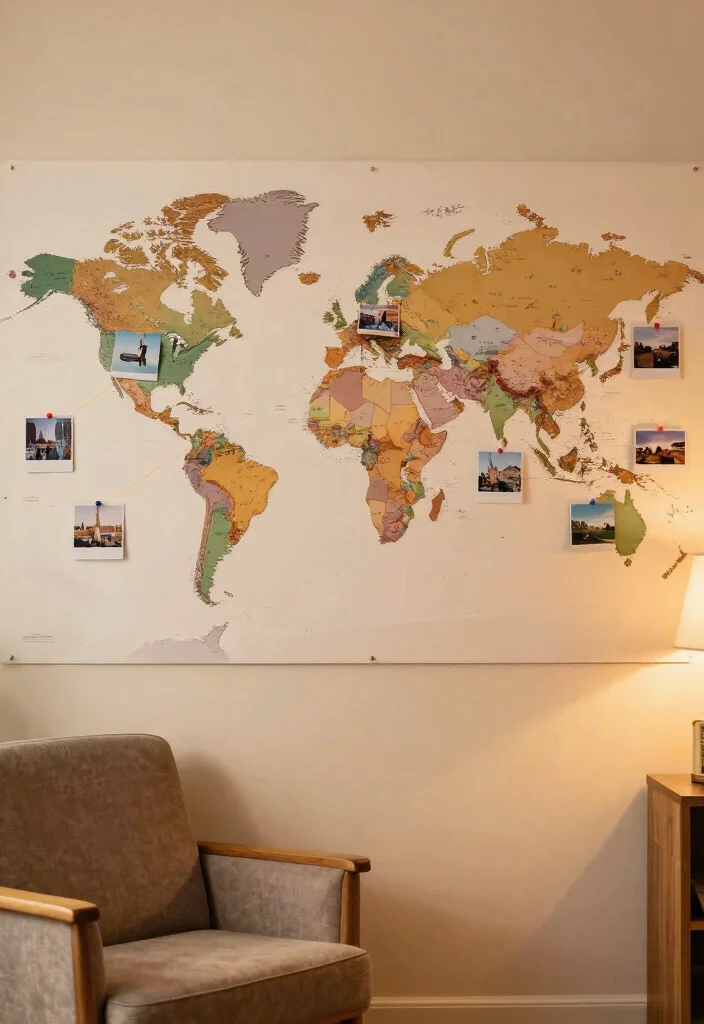
Transform your wall into a captivating world map of memories by pinning your photos to a large map print. This idea is especially delightful for travel enthusiasts wishing to celebrate their journeys through visual storytelling. Use colorful pins or washi tape to attach your photos to specific locations, creating a narrative that invites guests to explore your adventures.
Choose a map that resonates with your style—vintage for a classic touch or modern for a fresh look. This layout not only adds character but also sparks conversations about your travels, making it perfect for a living room or hallway.
Design Tips:
– Choose a vintage or modern map to set the tone for your decor.
– Use different colors of pins to denote various types of trips (family, solo, etc.).
– Incorporate quotes about travel to enhance the theme.
– You can also frame the map for a more finished look.
This design liberates your memories from an album, turning your wall into a captivating centerpiece that tells your unique story.
5. Thematic Collections
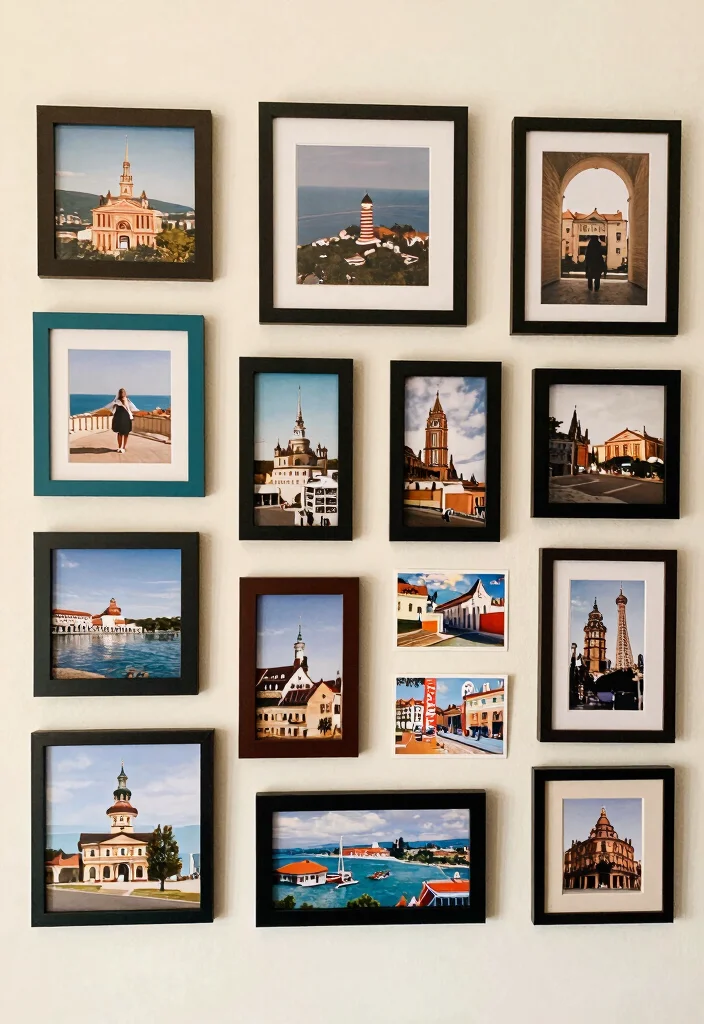
Thematic collections provide a unique opportunity to showcase shared experiences or interests through your photo wall. Whether it’s family vacations, special events, or hobbies, this approach creates a narrative that captivates viewers. Keeping similar frames or a consistent color palette helps unify the collection, allowing each theme to shine.
For example, a travel theme could feature snapshots of landmarks, cultural experiences, and joyful moments with friends. Designate a wall space to group these photos, creating a storytelling atmosphere that invites reflection and nostalgia.
Suggestions:
– Label the themes with small tags or captions to add context.
– Frame each collection in a similar style for a polished appearance.
– Incorporate memorabilia like postcards or ticket stubs to enhance the theme.
– Place the collection in a shared space where everyone can appreciate it.
This approach not only infuses your home with character but also serves as a daily reminder of cherished moments and the joy they bring.
6. Color Blocked Arrangement

A color-blocked arrangement invigorates your walls by grouping photos based on color themes, creating a visually striking layout. This trendy design allows your favorite memories to pop, making them the center of attention. Consider a palette of warm tones, cool colors, or even a monochrome theme to curate a vibrant display that reflects your style.
Arrange your photos in blocks to create a dynamic pattern across the wall. This playful approach works wonders in modern spaces, allowing you to express your artistic side while maintaining a cohesive look.
Execution Tips:
– Use colorful frames or matting to enhance the color block effect.
– Consider mixing in some artwork that complements the color scheme.
– Aim for balance in color distribution to avoid overwhelming the viewer.
– Bright colors can energize a room, while soft pastels create calm.
This layout celebrates creativity, giving you the chance to showcase your personality and artistic vision.
7. Frame without Borders
Opt for a borderless design with a free-flowing photo wall that blurs the lines between your cherished memories. This organic layout embraces overlapping photos, creating a relaxed and inviting display. Select a variety of frame sizes and styles, then arrange them freely, letting creativity guide your choices.
This style is particularly suited for casual spaces where a playful energy is welcome. Incorporating non-frame elements like canvases or fabric can add further texture and depth to your display.
Design Considerations:
– Choose a consistent color scheme for frames to maintain cohesiveness.
– Allow some photos to hang off the edges for a spontaneous look.
– Incorporate other decor pieces, like wall art or hanging decorations, for added dimension.
– Be mindful of the spacing to avoid a cluttered appearance.
This layout encourages you to celebrate your memories in a unique and fun way, reflecting your personal style.
8. Vintage Frame Gallery

For lovers of nostalgia, a vintage frame gallery brings a charming, old-world feel to your home. By using mismatched vintage frames, you can create a whimsical display that reflects your appreciation for history and artistry. Start by scouring thrift stores for unique shapes and textures, then curate a collection of family photos and classic artworks to fill them.
This style adds warmth and character, making it ideal for living rooms or hallways. The charming imperfections of vintage frames tell their own stories, enhancing your decor’s personality.
Tips for Creating a Vintage Frame Gallery:
– Opt for frames with ornate details, peeling paint, or patinas for authenticity.
– Include a mix of black-and-white and colored photos for contrast.
– Hang frames at different heights for a playful look.
– Don’t shy away from odd shapes and sizes; they can add to the charm.
This design invites storytelling and depth to your decor, allowing cherished memories to shine through.
9. String Light Photo Display
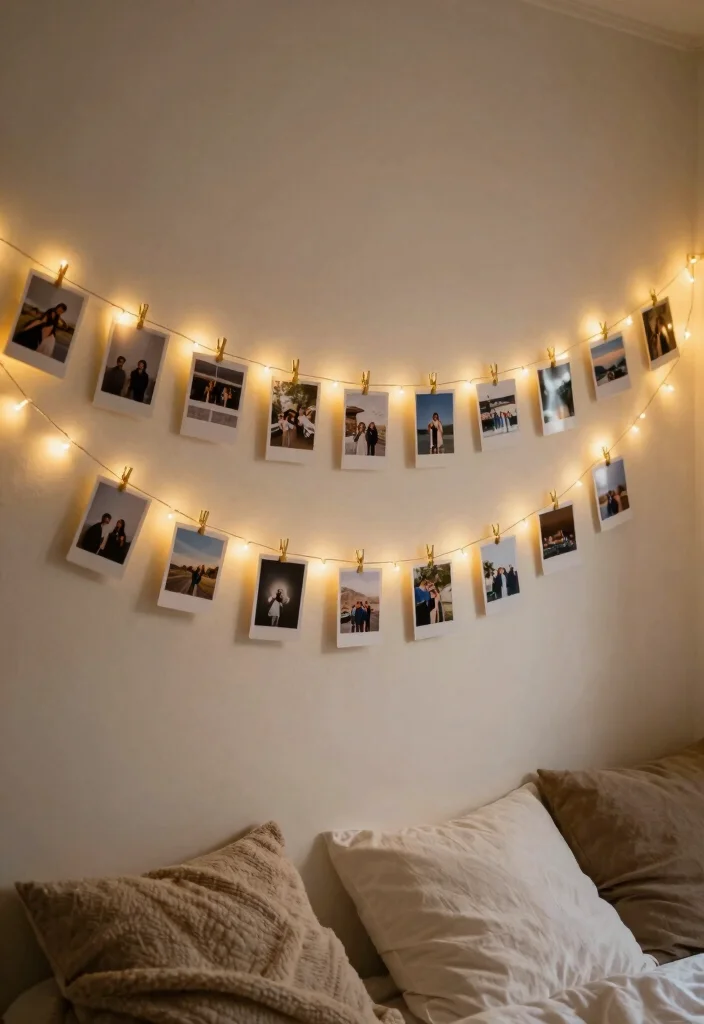
If you seek a magical touch, a string light photo display creates an enchanting blend of lighting and photography. This layout is ideal for cozy spaces, as it highlights your favorite memories with a soft, warm glow. Simply use a length of string lights to hang photos with clothespins, adding a whimsical charm to any room.
Consider this setup in bedrooms, dorm rooms, or as a delightful addition to your living space. The gentle illumination will make your photos sparkle, adding a cozy ambiance.
Tips for a String Light Display:
– Choose warm white lights for a cozy, inviting ambiance.
– Arrange the string lights in waves or cascading patterns for a dreamy look.
– Mix in some decorative elements like greenery or paper lanterns.
– Use photos printed on cardstock for better durability.
This layout adds intimacy to your decor, turning your cherished memories into a work of art.
10. Rotating Photo Frame

Why limit yourself to just one photo when a rotating frame allows you to showcase many? This versatile display keeps your decor fresh and exciting with just a simple twist. Invest in a quality rotating frame that holds multiple photos, placing it on a tabletop or shelf for easy viewing.
This design is perfect for those who love to capture every moment, as it allows you to showcase current favorites while effortlessly rotating out older memories.
Best Practices:
– Choose a frame that complements your decor style—simple wood for a rustic feel or sleek metal for modern aesthetics.
– Keep the photos within a theme for a cohesive look.
– Regularly update the photos to reflect your latest adventures and milestones.
This layout is not only practical but also a fun way to keep your space dynamic and engaging.
11. Photo Ladder Display
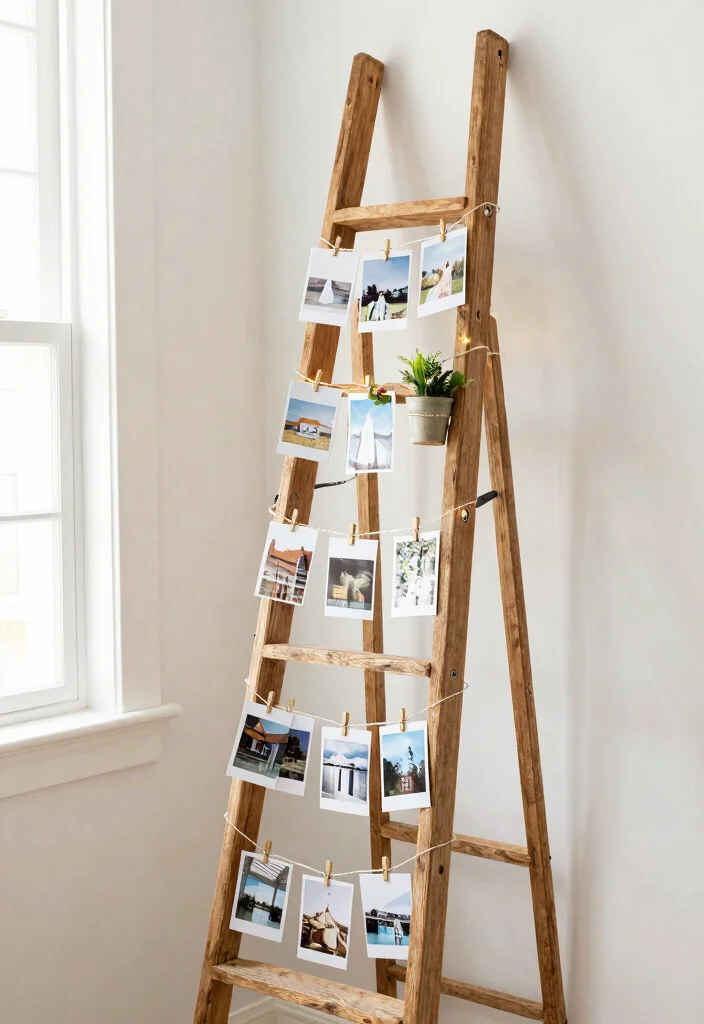
A photo ladder display adds a rustic touch while charmingly presenting your favorite memories. By using a wooden ladder as a base, you can hang photos for a casual yet stylish look. Start with a slim ladder that fits your space, draping string or ribbon across the rungs and attaching photos with clothespins or clips.
This unique setup works beautifully in corners or as a focal piece in your living area, inviting warmth and creativity.
Tips for Creating a Photo Ladder:
– Paint or stain the ladder to match your decor style.
– Mix different photo sizes for a playful display.
– Incorporate decorative pieces like small plants or fairy lights for added charm.
– Ensure the ladder is stable to prevent tipping.
This layout feels whimsical while providing an effortless way to swap out photos as new memories are created.
12. Oversized Artwork and Photos

Sometimes, less is more, and an oversized artwork or photo can become a striking statement in your room. Choose a large canvas print or poster of your favorite memory and mount it as a focal point on your wall. This display thrives in open spaces with minimal decor, allowing the photo to shine on its own.
You can pair it with smaller artworks for a gallery feel or let it stand alone for maximum impact.
Best Practices:
– Ensure the artwork complements your color scheme and decor style.
– Hang it at eye level for optimal viewing.
– Consider framing it to add elegance and polish.
This approach showcases not just your memories but also your artistic taste, creating a stunning visual centerpiece.
13. Vertical Column Display

Utilizing vertical space creatively, a vertical column display transforms your wall into a sleek showcase for photos. This design highlights a series of images aligned in a straight column, making it an excellent option for narrow walls or corridors. Select a few standout photos and arrange them from top to bottom, either alternating sizes or maintaining uniformity for a clean look.
This modern approach is perfect for minimalist decor, emphasizing simplicity and style.
Tips for Execution:
– Use a level to ensure that each photo lines up perfectly.
– Choose frames that complement each other, either in color or style.
– You can also label the photos with small captions for added detail.
– Adding a decorative element at the base, like a small plant, can enhance the look.
This layout is straightforward yet extremely stylish, maximizing the potential of your wall space.
14. Monochromatic Gallery

Create a sophisticated monochromatic gallery wall by using exclusively black and white photos. This striking contrast creates a timeless and elegant feel that works beautifully in any room. Begin by selecting your favorite photos and printing them in black and white, ensuring they resonate with each other.
Using matching frames will enhance the unified look, whether you opt for a grid or freeform arrangement. This approach celebrates your cherished memories while adding dramatic flair to your decor.
Design Tips:
– Include a mix of personal photographs and abstract art.
– Use varied frame styles for added interest while keeping the color scheme consistent.
– Hang the pieces at eye level for optimal viewing.
This layout makes a bold statement, becoming a captivating focal point in your home.
15. Quilt of Memories

Bring warmth and comfort to your home with a quilt of memories! This unique approach involves creating a patchwork-style photo wall using fabric, photos, and personal mementos. Choose a quilt-like shape for your layout and select fabric swatches or colored paper for your photos. Attach the photos to the fabric and arrange them in a charming patchwork style on the wall.
This design not only adds color and texture but also tells a personal story that is uniquely yours.
Tips for Execution:
– Use a variety of fabrics with different textures for an appealing look.
– Include handwritten notes or quotes beside photos for a personal touch.
– Ensure that the layout has a clear structure to avoid clutter.
This layout personalizes your space, creating a heartwarming focal point that celebrates your memories.
16. Minimalist Photo Wall

For those who appreciate a clean and modern aesthetic, a minimalist photo wall is the perfect solution. This style emphasizes simplicity, allowing your selected photos to take center stage. Choose a few meaningful images and display them in sleek, modern frames, keeping the arrangements sparse to maintain a clutter-free look.
This design works wonderfully in contemporary homes where elegance and minimalism are desired.
Execution Tips:
– Stick to a neutral color palette for frames to keep the focus on the photos.
– Hang photos at eye level for optimal viewing and impact.
– Use space effectively; don’t cram too many photos into a small area.
A minimalist photo wall highlights your cherished memories while enhancing the overall decor of your living space.
17. Family Tree Display

Celebrate your heritage with a family tree display that pays homage to your loved ones. This layout creatively showcases family photos in a tree-like arrangement, turning your wall into a beautiful tribute. Start by outlining a tree shape on your wall using painter’s tape or removable decals, attaching photos of family members along the branches.
This design not only adds character to your decor but also serves as a reminder of your family’s rich history.
Tips for Execution:
– Use a consistent frame style for a cohesive look.
– Label each photo with names or dates for context.
– Consider using a family tree template for guidance.
This layout provides a unique and personal touch, transforming your wall into a celebration of family connections.
18. Seasonal Photo Display
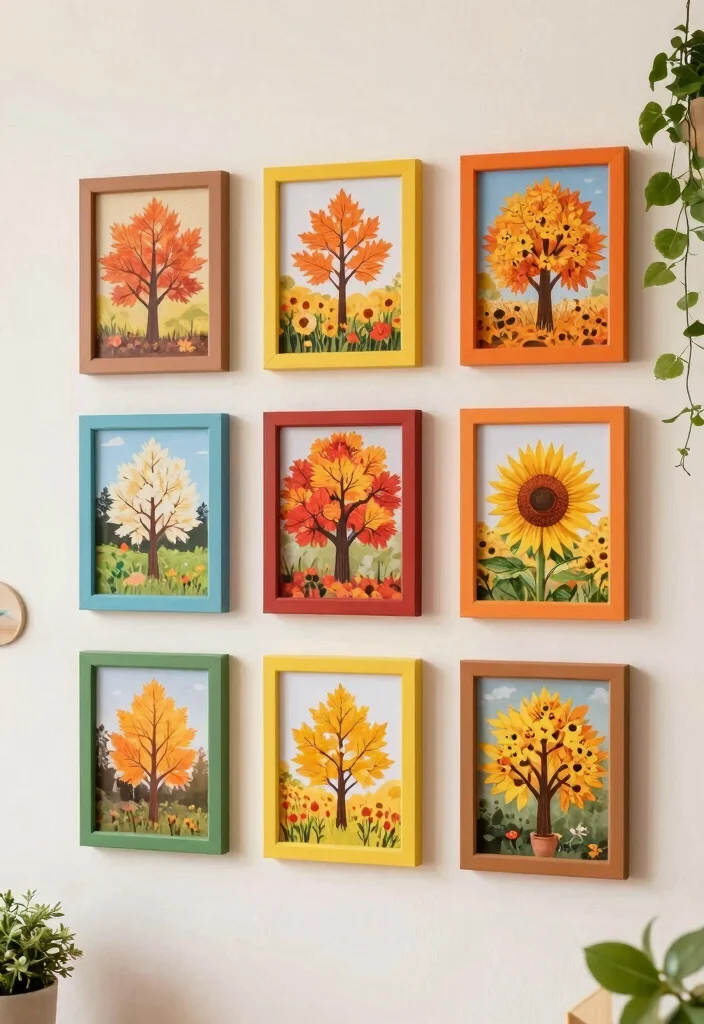
Why not refresh your decor with the seasons? A seasonal photo display allows you to switch out photos based on the time of year, keeping your space lively and engaging. Select a series of images that capture the essence of each season—think summer vacations, autumn foliage, winter festivities, and spring blooms.
Designate a specific area on your wall or use a dedicated frame that makes swapping easy. This layout not only maintains dynamism in your decor but also celebrates the moments each season brings.
Best Practices:
– Use seasonal colors in frames to complement the theme.
– Store off-season photos safely for easy access.
– Refresh the display regularly to keep it interesting.
This approach turns your wall into a dynamic showcase reflecting the beauty of changing seasons.
19. Creative Photo Holders
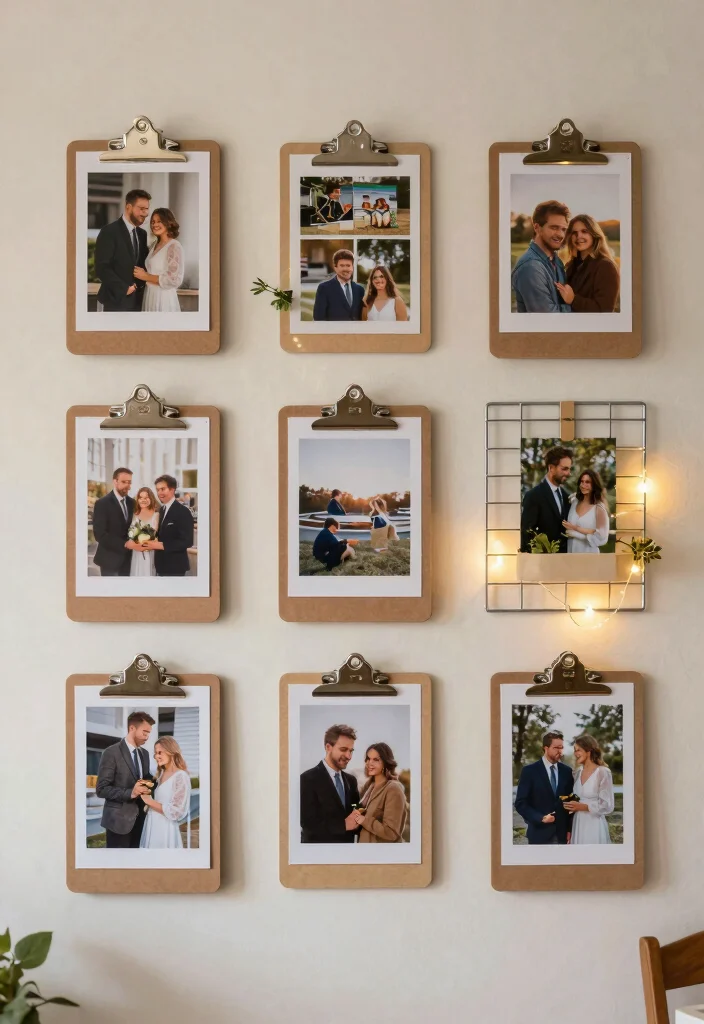
Get inventive with your displays by using creative photo holders instead of traditional frames! This layout allows for unique showcases that stand out and invite curiosity. Consider using clipboards, wire grids, or vintage window frames to present your photos. Each holder adds charm and character while allowing for easy updates to your display.
This style encourages creativity and can be tailored to match any decor aesthetic, making it an exciting feature in your home.
Execution Tips:
– Choose holders that complement your home’s aesthetic.
– Mix different styles for an eclectic look.
– Incorporate other decorative elements like lights or florals for added flair.
This layout invites fun and exploration, transforming your photo display into a unique centerpiece.
Conclusion
Creating a DIY photo wall is not just about displaying memories—it’s about telling your story and personalizing your space. Each layout offers a unique way to celebrate your cherished moments while reflecting your personality and style.
Whether you choose a classic grid, a whimsical ladder display, or a seasonal photo swap, your wall can transform into a beautiful canvas of life. Take the time to curate a collection that speaks to you, and enjoy watching your memories come to life on the walls of your home.
Frequently Asked Questions
What are the best layout ideas for a small space photo wall?
For small spaces, start with a plan and a focal point. Consider a clean grid for a neat, orderly look, or a salon-style cluster for a more creative vibe. Sketch your layout on paper or use painter’s tape on the wall to preview the arrangement before you drill. From the article’s 19 memory-filled layouts, mix grid, staggered, and vertical alignments to suit your space. Keep even spacing (about 2–3 inches) and choose frames in a cohesive color family to pull the memories together as home decor DIY and photo display ideas.
What tools and supplies do I need for a DIY photo wall?
You don’t need fancy gear—start with the basics: frames, mounting hardware, a level, measuring tape, pencil, and paper templates. Cut out your photos to scale on kraft paper, tape them to the wall with painter’s tape to test the layout, then transfer the plan to the real wall. Add adhesive strips or mounting putty for light frames, a stud finder for heavier pieces, and a small ruler for precise spacing. With these basics, you can execute a polished DIY wall art display that elevates home decoration tips and creative photo layouts.
How can I personalize a photo wall on a budget?
Personalized home decor doesn’t have to be pricey. Reuse frames you already own, repaint mismatched frames in a cohesive color, and print photos at local labs or online to save. Create a simple story arc with memories—begin with a childhood photo, move to milestones, then to current favorites. Mix free printable typography or captions to add meaning, and sprinkle small souvenirs (tickets, postcards) for texture. This approach delivers personalized home decor and photo display ideas without breaking the bank.
How often should I update or refresh the photo wall, and how can I rotate memories easily?
Treat your wall as a living album. Refresh a few frames seasonally, or set a 3–6 month rotation for memories that matter most. Use a modular layout (like a grid with interchangeable inserts) or a wire/accent rail system to swap photos quickly. Keep a digital archive and print new favorites when you feel inspired. This keeps your home decor DIY feeling fresh and aligns with regular home decoration tips.
What are common mistakes to avoid when designing a photo wall?
Common mistakes include not planning the layout, mixing too many frame styles, ignoring lighting, and letting glare steal the show. Avoid uneven spacing and overwhelming with 15+ photos in one row—let your story breathe. Use templates, start with a focal piece, and test arrangements on the floor or wall before committing. By steering clear of these traps, you’ll achieve creative photo layouts and confident DIY wall art that feels intentional.